Does your BMW still have the dated-looking lights from a decade ago? You’re not alone in feeling that dim, yellowed halogen lights or early-gen LEDs can make an otherwise pristine car look old. This clash between timeless engineering and aging technology is a common frustration for proud owners.
Upgrading your BMW’s headlights and taillights is the single most effective way to modernize its appearance, increase resale value, and improve nighttime safety. These upgrades replace outdated units with vibrant technologies like GTS style OLED or Laser headlights, often featuring sequential turn signals and dynamic startup animations. This instantly transforms your car’s presence on the road.
Leveraging tested frameworks and an analysis of current market data, this guide breaks down the best lighting upgrades available. We will explore everything from simple plug-and-play swaps to full pre-LCI to LCI conversions. You will discover which modifications offer the biggest impact and how to execute them flawlessly.
Why Upgrade Your BMW Headlights and Taillights for a Modern Look?
The lighting on your BMW is one of its most defining features, but technology evolves quickly. Older models, even with iconic designs, are often let down by outdated BMW halogen lights or first-generation LEDs that appear dim, yellow, and uninspired compared to the crisp, bright designs of 2026. Upgrading your BMW headlights taillights is more than just a cosmetic change; it’s a functional and aesthetic transformation that breathes new life into your vehicle. Modern BMW lighting upgrades not only dramatically improve night driving visibility and safety but also adopt the aggressive and sophisticated styling seen on newer models like the M4 GTS. By moving from a pre-LCI (pre-facelift) look to a modern LCI (facelift) or aftermarket style, you effectively roll back the visual age of your car, enhancing both your pride in ownership and its potential resale value. This is one of the highest-impact modifications you can perform.
7 Best BMW Headlights Taillights GTS Upgrades in 2026
Directly fulfilling the desire for a modern and aggressive look, a curated set of lighting upgrades can completely transform your BMW’s road presence. These seven options represent the best in the BMW aftermarket lighting scene for 2026, ranging from simple, high-impact changes to comprehensive conversions. We will cover everything from the iconic GTS style conversion with sequential taillights to full LCI retrofits. Each upgrade is selected for its aesthetic impact, popularity within the enthusiast community, and the tangible value it adds. This list will serve as your guide to the most effective BMW light kits and modifications, with practical advice for brands like VLAND and Bayoptiks, and considerations for specific chassis like the F30 3 Series or F82 M4.
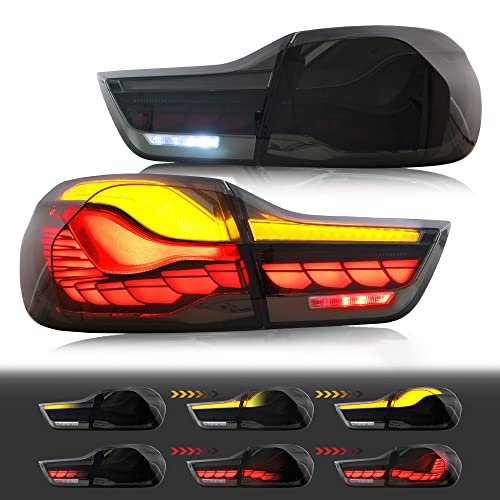
1. Retrofit Your Rear with GTS Style OLED Taillights

Pin this iconic mod to your ‘BMW Upgrades’ board!
The GTS style OLED taillight is arguably the most sought-after rear-end modification for any modern BMW, especially for the F30 3 Series and F80 M3 chassis. This OLED taillight upgrade replaces the standard LED bars with intricate, three-dimensional glowing elements that perform a stunning dynamic animation upon startup. It’s a signature look taken directly from BMW’s limited-edition M4 GTS, and high-quality aftermarket versions from brands like VLAND and Bayoptiks make this elite aesthetic accessible. The best part is that most kits are designed for a direct plug and play installation, instantly elevating your car’s style.
Tools & Parts Needed
- GTS Style OLED Taillight Assembly (VLAND or Bayoptiks brand recommended)
- Plastic Trim Removal Tool Kit
- 8mm or 10mm Socket with Ratchet (depending on model)
- Torx T-20 Screwdriver
- Needle-nose Pliers (for occasional stubborn clips)
Installation Steps
- Disconnect the Battery: As a safety precaution, disconnect the negative terminal of your car’s battery.
- Access the Taillight Housing: Open the trunk and use the trim removal tool to gently pop off the carpeted liner panels covering the back of the taillights.
- Unplug the Harness: Carefully disconnect the main wiring harness from the back of the OEM taillight unit.
- Unbolt the OEM Unit: Use the socket and ratchet to remove the three or four nuts holding the taillight assembly in place. The entire unit should now pull out from the rear of the car.
- Install the New Unit: Seat the new GTS style OLED assembly into the opening. Ensure the weather gasket is properly aligned to prevent moisture ingress.
- Secure and Connect: Hand-tighten the nuts, then plug in the new
plug and playharness. Reconnect the battery and test all functions (running lights, brakes, sequential turn signals). - Reassemble: Once tested, fully tighten the nuts (do not overtighten) and replace the trunk liner panels.
Pro-Tip: Most modern GTS style taillights are
error-free, but if you encounter a “Tail Lamp Malfunction” warning on your iDrive screen, you may need to use an app like BimmerCode in expert mode to code out the warm and cold bulb checks for the taillight circuits.
![VLAND OLED Sequential Upgrade Smoked Taillights Compatible for [BMW M3 / 3 Series F30 F35 F80 Sedan 6th Gen 2013-2018] with Dragon Scales Running Light](https://m.media-amazon.com/images/I/51CRaqi0JML.jpg "BMW Headlights Taillights: 7 Best GTS Upgrades in [year] 2")
2. Upgrade to Aggressive CSL Style Laser Headlights

Save this stunning headlight mod for your future build!
Inspired by BMW’s track-focused CSL models, the CSL laser style headlight conversion is the ultimate statement for a modern front end. The defining feature is the striking yellow DRLs (Daytime Running Lights), a nod to endurance racing cars. This laser headlight conversion replaces the standard white angel eyes with a piercing yellow glow that is both aggressive and unmistakably high-tech. These complete assemblies often mimic the functionality of adaptive LED headlights and provide a massive aesthetic upgrade over the stock units on models like the G20 3 Series or F32 4 Series. While visually stunning, this modification is more involved than a simple taillight swap.
Tools & Parts Needed
- CSL Style Laser Headlight Assemblies (model-specific)
- Full Socket Set with Extensions
- Torx Bit Set (T-25, T-30)
- Bumper Removal/Release Tool
- Floor Jack and Jack Stands for easier wheel well access
Installation Steps
- Prepare for Bumper Removal: Jack up the front of the car and remove the front wheels for easier access to the fender liners.
- Remove the Front Bumper: This is the most intensive step. Remove all screws and bolts securing the bumper in the wheel wells, underneath the car, and on top near the radiator support. Carefully disconnect any sensor wiring and use the release tool to unclip the sides.
- Access the Headlights: With the bumper off, the headlight mounting bolts are now fully accessible.
- Swap the Assemblies: Disconnect the main wiring harness and unbolt the OEM headlight unit. Install the new CSL style unit, ensuring it is securely mounted.
- Connect and Test: Plug in the new headlight’s harness. Temporarily reconnect the battery and test the DRLs, low beams, high beams, and turn signals.
- Align the Headlights: Before reinstalling the bumper, park on a level surface facing a wall and align the headlight beams according to DOT guidelines to ensure proper night driving visibility and avoid blinding other drivers.
- Reassemble: Reinstall the front bumper, reconnect all sensors, and secure all fasteners.
Lesson Learned: From personal experience, headlight upgrades requiring front bumper removal are an intermediate to advanced DIY job. Set aside at least 3-4 hours. Taking photos of every bolt you remove can be a lifesaver during reassembly.

3. Install Dynamic Sequential Mirror Turn Signals

Add this easy upgrade to your DIY list!
For those wondering how to install sequential turn signals?, this is one of the easiest and most affordable ways to add a touch of modern dynamism to your BMW. This upgrade replaces the simple on/off blinker in your side mirrors with a dynamic amber light that flows from the inside out. Often available with a smoked lens, these units add a stealthy, custom look even when off. It’s a beginner-friendly modification that requires minimal tools and time but provides a surprisingly high-end feel every time you signal a lane change. Most kits are error-free and plug and play, making it a perfect first project for any DIY enthusiast.
Tools & Parts Needed
- Dynamic Sequential Mirror Indicator Set
- Plastic Pry Tool (essential to avoid scratches)
- Torx T-10 Screwdriver
Installation Steps
- Position the Mirror: Using the electronic controls, tilt the mirror glass all the way down and inward to create a gap at the top outer edge.
- Remove the Mirror Glass: Gently insert the plastic pry tool into the gap and carefully pry the mirror glass off its clips. It is held on by a central clip and may have heating element wires attached—disconnect these gently.
- Remove the Mirror Cap: With the glass removed, you will see the clips and/or Torx screws holding the painted mirror cap on. Release them and slide the cap off.
- Swap the Indicator: The OEM turn signal unit is now exposed. Unplug its connector, remove the screw(s) holding it in place, and swap it with the new sequential LED unit.
- Test the Signal: Before reassembling, turn on your car’s hazard lights to test the new dynamic signal.
- Reassemble: Screw the new indicator in place, snap the mirror cap back on, reconnect the heating wires (if applicable), and carefully press the mirror glass back onto its mounting clips until it clicks securely.
Pro-Tip: When prying off the mirror glass, apply steady, even pressure. Never twist the pry tool, as this can easily crack the glass. Some owners find it helpful to apply a little heat from a hairdryer to the mirror cap to make the plastic more pliable.

4. Adopt the OEM+ Look with a Blackline LCI Taillight Upgrade

Pin this clean OEM+ upgrade for your E90!
For owners who prefer a subtle, factory-fresh look, the BMW blackline taillights upgrade is the perfect choice. This modification is a cornerstone of the pre-LCI to LCI conversion path, particularly for the beloved E90 3 Series. The term Life Cycle Impulse (LCI) refers to BMW’s mid-cycle refresh, and these taillights are a key part of that updated look. Blackline lights feature a darker, tinted upper portion that gives the rear a cleaner, more modern appearance without being as aggressive as GTS styles. It’s the quintessential OEM+ modification—an upgrade that looks like it could have, and should have, come from the factory.
Tools & Parts Needed
- E90 LCI Blackline Taillight Kit (Inner and Outer lights)
- 8mm Socket and Ratchet
- Trim Removal Tool
- Optional: FRM3 Footwell Module (if yours fails during install)
Installation Steps
- Access Taillights: Open the trunk and remove the carpet liner panels covering the inner and outer taillight housings.
- Remove Outer Taillight: Unplug the harness and undo the 8mm nuts holding the main outer taillight. Remove the unit.
- Remove Inner Taillight: The inner (trunk-mounted) portion is usually held by one or two 8mm nuts accessible from behind the trunk lid’s carpet. Remove it.
- Install New LCI Lights: Install the new Blackline units in reverse order. The outer unit goes in first, followed by the inner trunk unit.
- Connect and Test: Most high-quality LCI kits are
plug and playand will not require coding. Connect the harnesses and test all light functions. - Reassemble: Secure all carpet liners.
Pro-Tip: The E90 3 Series is notorious for Footwell Module (FRM) failure, especially the FRM3 version. Disconnecting the battery before starting any lighting work is highly recommended to minimize the risk of shorting and corrupting the module. If your windows/lights stop working after the install, you may need an FRM3 repair.

5. Apply a Protective and Stylish Smoked Lens Tint

Pin this guide for a subtle, stealthy look!
If you’re asking, how to tint BMW headlights and taillights?, this is the most affordable and reversible way to achieve a stealthy smoked lens look. Rather than replacing the entire assembly, applying a high-quality tint film can provide a “blacked out” appearance while also offering crucial UV protection against lens oxidation and yellowing. The key is to use a proper Paint Protection Film (PPF) designed for lighting, not cheap vinyl which can drastically reduce light output and turn purple over time. A light smoke tint can add a touch of aggression while maintaining safety and legality.
Supplies Needed
- Pre-cut Headlight/Taillight Tint Kit (high-quality PPF, not vinyl)
- Slip Solution (a few drops of baby shampoo in a spray bottle of water)
- Tack Solution (a small amount of isopropyl alcohol in a spray bottle of water)
- Felt-edged Squeegee
- Heat Gun or Hairdryer
- Microfiber Towels
Application Steps
- Clean the Lens: Thoroughly clean the headlight or taillight surface with isopropyl alcohol to remove all wax, dirt, and oils. The surface must be pristine.
- Apply Slip Solution: Spray the light lens and your own fingertips generously with the slip solution. This allows you to position the film.
- Apply the Film: Peel the tint film from its backing and spray its adhesive side with the slip solution. Carefully lay the wet film onto the wet lens.
- Position and Squeegee: Slide the film into perfect alignment. Once positioned, spray the top of the film with slip solution and begin squeegeeing from the center outwards, pushing the water out.
- Tack the Edges: For curved areas, gently heat the film with the heat gun to make it pliable. You can spray a little tack solution on the edge to help it stick as you wrap it around the curve.
- Final Squeegee and Cure: Go over the entire surface again, ensuring all bubbles and water are removed. Let the film cure for 24-48 hours before washing the car.
Pro-Tip: Always use a high-quality, thermoformable Paint Protection Film (PPF) designed for lights, not cheap vinyl. PPF offers better UV protection, self-healing properties, and superior optical clarity, ensuring your light output isn’t dangerously diminished. Check local laws regarding tint darkness.

6. Replace Dim Halogen Fog Lights with Full LED Assemblies

Pin this essential safety and style upgrade!
One of the biggest giveaways of an older BMW is the clash between crisp white xenon headlights and the dim, yellow glow of halogen fog lights. Answering the common question, Can I upgrade BMW halogen to LED?, the definitive answer is yes, and it’s a crucial step for a cohesive look. This upgrade provides both an aesthetic and a safety benefit. A full LED fog light assembly not only provides a modern, 6000K white light that matches modern headlights but also offers greatly improved visibility in poor weather. These kits are often error-free, with built-in resistors to prevent flickering or dashboard warnings.
Tools & Parts Needed
- Full LED Fog Light Assemblies (Left and Right)
- Torx Screwdriver Set
- Jack and Jack Stands (may be needed for access)
- Trim Removal Tool
Installation Steps
- Access the Fog Lights: Depending on your BMW model (G05 X5, F30, etc.), access may be through the front of the fender liner or by removing the plastic fog light surround grille.
- Remove the Surround: Use a plastic trim tool to carefully pry off the plastic grille surrounding the fog light.
- Unbolt the Halogen Unit: The OEM halogen fog light assembly is typically held in by two or three Torx screws. Remove them.
- Disconnect and Remove: Pull the unit forward, unplug the wiring harness, and remove the old assembly.
- Install the LED Assembly: Place the new full LED assembly into the bumper, secure it with the original Torx screws, and plug in the
error-freeconnector. - Test and Reassemble: Turn on the car and fog lights to test functionality. If they work correctly, snap the plastic surround grille back into place.
Lesson Learned: While just swapping to an LED bulb is cheaper, it can cause hyper-flashing or
canbus errormessages. More importantly, halogen housings aren’t designed for the heat dissipation of LEDs and can cause a poor beam pattern. Replacing the entire assembly is theproven fixfor a clean, safe, and reliable upgrade.

7. Perform a Full Pre-LCI to LCI Headlight Conversion

Learn the ultimate OEM+ front-end conversion!
This is the ultimate OEM+ front-end upgrade for the dedicated enthusiast: a full pre-LCI to LCI headlight conversion. For a model like the F30 3 Series, this means swapping the original round ‘angel eye’ headlights for the sharper, more aggressive hexagonal updated angel eyes of the facelifted model. This project is the most involved, as it replaces OEM hardware and absolutely requires coding to function correctly. However, the reward is a car that looks several years newer, using parts that offer perfect, factory OEM fitment. It’s the most comprehensive way to update your car’s face and a true badge of honor for any DIYer who completes it.
Tools & Parts Needed
- OEM or High-Quality Replica LCI Headlight Assemblies
- LCI Conversion Wiring Harness Adapter
- Full Tool Kit with Torx and Socket Set
- Laptop with ESYS or a Pro Tool/BimmerCode for coding
- Front Bumper Removal tools as listed in Idea #2
Installation Steps
- Complete Bumper Removal: Follow the steps from Idea #2 to completely remove the front bumper for full access to the headlights.
- Swap the Headlights: Disassemble the old Pre-LCI headlights and physically mount the new LCI assemblies. The mounting points are identical.
- Connect the Adapter Harness: This is the critical step. The Pre-LCI wiring plug will not fit the LCI headlight. Connect the conversion harness adapter between the car’s harness and the new headlight.
- Code the Car: This is not
plug and play. You must connect to the car’s OBD2 port and use coding software to change the car’s vehicle order (VO) to tell the FEM module that it now has LCI LED headlights. This enables the DRLs and turn signals to function correctly. - Test and Align: Before reinstalling the bumper, test all lighting functions. If everything works, perform a final headlight alignment.
- Reassemble: Carefully reinstall the front bumper and all associated trim and hardware.
Pro-Tip: The coding portion is the most challenging part of this retrofit. If you are not comfortable with BimmerCode expert mode or ESYS, many remote coding specialists can log into your laptop and perform the necessary VO coding for you for a fee. This is a
proven fixto avoid endless frustration.

Key Takeaways: Your Quick Guide to BMW Lighting Upgrades
Transforming your car’s appearance and improving its safety is highly achievable with the right knowledge. Upgrading your BMW headlights taillights is one of the most rewarding modifications available to an owner. From achieving the coveted GTS style aesthetic to simply ensuring your car looks as modern as it feels, these projects offer immense value. Whether you’re tackling a simple BMW LED conversion or a more complex pre-LCI to LCI project, the core principles remain the same: choose quality parts, understand the process, and prioritize safety and proper alignment.
Key Takeaways:
- Aesthetics and Safety Drive Upgrades: The primary reasons to upgrade BMW headlights taillights are to achieve a modern GTS style or LCI look and to replace dim, unsafe halogen lights with bright, efficient BMW LED conversion kits.
- GTS vs. LCI: GTS style upgrades (like OLED taillight upgrades) offer an aggressive, aftermarket look, while LCI (Life Cycle Impulse) conversions provide a subtle, factory-fresh update to make an older car look like its facelifted version.
- Coding May Be Required: While many kits are
plug and play, more advanced retrofits like pre-LCI to LCI conversions or eliminating acanbus errorwill require coding with tools like BimmerCode or ESYS. - Check for DOT/SAE Compliance: Always choose aftermarket lighting that is DOT approved or SAE certified. This ensures proper beam patterns for safety and meets legal requirements.
- Assembly vs. Bulb: For a reliable,
error-freeresult without flickering or heat issues, it’s almost always better to replace the entire headlight or taillight assembly rather than just swapping the bulb. - Start with Easy Mods: If you’re new to DIY, start with a simple project like sequential mirror turn signals or Blackline taillights before attempting a full headlight conversion that requires front bumper removal.
People Also Ask About BMW Headlights Taillights
Many common questions arise when planning a lighting upgrade. Addressing these points can clear up confusion around topics like coding, legality, and model-specific issues. This section tackles the most frequently asked questions to help you move forward with your project confidently, ensuring you have all the information you need for a successful and satisfying result.
What is the difference between Pre-LCI and LCI?
LCI stands for “Life Cycle Impulse,” which is BMW’s term for a mid-generation model facelift. A Pre-LCI car is the original launch version, while an LCI car has updated styling. For BMW headlights taillights, this typically means a change in the shape of the “angel eye” DRLs, a switch to full LED technology, and different internal graphics, like the move from simple light bars to the intricate GTS style OLED look.
Do BMW taillights require coding?
It depends on the upgrade. Simple replacements like Blackline taillights or high-quality plug-and-play aftermarket units often do not require coding. However, more complex pre-LCI to LCI retrofits or installing units that cause a canbus error (a “lamp out” warning on the dash) will require coding with an app like BimmerCode to tell the car’s computer to ignore the bulb check for those circuits.
How to fix BMW tail light ground wire?
A common issue, especially on the E90 chassis, is a melted tail light connector due to a weak ground wire. The proven fix involves buying a tail light ground wire repair kit. You must cut the faulty brown (ground) wire from the harness, and using a butt connector, splice in the new, heavier-gauge ground wire which is then grounded directly to a clean metal point on the car’s chassis.
Are VLAND headlights good for BMW?
VLAND is one of the most popular and well-regarded aftermarket brands for BMW lighting upgrades. They offer a good balance of modern styling (like GTS and CSL styles), plug-and-play installation, and affordability. While not always matching the build quality of OEM Hella or Valeo units, they are considered a top choice in the OEM vs Aftermarket debate for enthusiasts on a budget.
How to clear condensation in BMW headlights?
First, determine the cause. If it’s a small amount of fogging after a car wash that disappears, it’s often normal. If there’s standing water (moisture ingress), the headlight’s rear seal or cap is likely compromised. You’ll need to remove the headlight, drain the water, use a hairdryer on a low setting to dry it completely, and then carefully re-seal all caps and seams with automotive-grade silicone sealant.
What are BMW blackline taillights?
BMW Blackline taillights are an official OEM or OEM-style upgrade that features a darker, “smoked” top section while keeping the lower red section bright and legal. They are a very popular, subtle modification for models like the E90 3 Series to give the car a cleaner, more modern OEM+ appearance without being overly aggressive.
Is it legal to smoke BMW taillights?
This depends heavily on your local laws. In most places, applying a very light smoke tint that doesn’t significantly reduce the light output of the brake lights and turn signals is acceptable. However, using “blackout” tint that makes the lights invisible during the day is illegal everywhere and extremely unsafe. Always choose a light smoke tint and check that your brake lights are still clearly visible from a distance.
Can I upgrade BMW halogen to LED?
Yes, upgrading from halogen to LED is one of the best upgrades you can do. The best method is to replace the entire halogen headlight assembly with a full LED assembly. While you can put LED bulbs in halogen housings, it often creates a poor beam pattern, can cause flickering, and may lead to overheating. A full assembly integrates proper projectors and heat management.
Why do my BMW lights stay on after locking?
This is usually due to the “Pathway Lighting” or “Follow-me-home” feature, which is adjustable in iDrive under “Settings > Lighting > Exterior Lighting.” If the lights stay on indefinitely, it could indicate a failing Footwell Module (FRM) or a faulty door sensor that is preventing the car from knowing it’s fully locked and secured.
How do I install sequential turn signals?
For most BMW models, installing sequential mirror turn signals is a simple DIY project. It involves carefully prying off the mirror glass, removing the mirror cap, and then swapping the original static blinker unit for the new plug-and-play sequential unit. The entire process usually takes less than 30 minutes for both sides.
Final Thoughts on Your BMW Lighting Transformation
Upgrading your BMW headlights and taillights stands out as one of the most impactful and rewarding modifications you can undertake. It’s a project that delivers on two critical fronts: revitalizing your vehicle’s aesthetic with a modern, aggressive style and significantly enhancing safety through improved visibility. Whether you opt for a bold GTS style conversion or a subtle and clean LCI update, you are directly investing in your driving experience and the car’s overall presence. With the right parts and a clear understanding of the process, these upgrades are well within the reach of a determined DIY enthusiast. Which lighting upgrade will you tackle first to transform your BMW’s look for 2026?
Last update on 2026-04-09 / Affiliate links / Images from Amazon Product Advertising API


![Car Living Sedan: 11 Stealth Hacks for a No-Build Setup [year]](https://i0.wp.com/carxplorer.com/wp-content/uploads/2026/04/Car-Living-Sedan-11-Stealth-Hacks-for-a-No-Build-Setup-year-1.jpg?resize=60%2C60&ssl=1 "Car Living Sedan: 11 Stealth Hacks for a No-Build Setup [year] 22")
