Ever felt like your car seat base has become a permanent part of your vehicle? You’re not alone. Many parents and caregivers find that after correctly installing a Graco car seat base for maximum safety, it can feel “practically fused to the seats,” making removal a surprisingly difficult task. The sheer tightness, designed for security, often makes the release mechanisms seem impossible to access or operate.
The primary strategy for how to remove a Graco car seat base is to first relieve the extreme tension on the LATCH strap or vehicle seat belt. This is most effectively done by pushing down hard on the base with your body weight, which creates the necessary slack to operate the release buttons and unhook the connectors.
This guide provides a clear, step-by-step process, grounded in common user experiences and manufacturer design principles, to help you confidently learn how to remove a Graco car seat base without the struggle. We will break down the exact techniques for releasing tension, identify the different installation methods, and cover critical safety information to ensure you can manage the task safely and efficiently.
Key Facts
- Tension is the Main Culprit: The number one reason a Graco base gets stuck is the extreme tension applied to the LATCH strap or seat belt during installation, which is a sign of a secure fit but complicates removal.
- Downward Pressure is the Secret: The most effective technique, mentioned consistently across user forums and expert guides, is to use your body weight to press the base down into the vehicle seat cushion, creating slack in the strap.
- SnugLock Models Differ: Graco bases with SnugLock technology have a distinct removal process that involves pressing a red button and lifting the SnugLock arm to release tension, rather than adjusting a strap buckle.
- Not All Bases are Removable: It is crucial to know that many all-in-one or 3-in-1 car seats, such as the Graco TriRide, feature a non-removable base. This guide primarily applies to infant car seats like the SnugRide series with separate, detachable bases.
- Professional Help is Available: If you cannot remove the base, the safest next step is to seek hands-on assistance from a certified Child Passenger Safety Technician (CPST), who can help without compromising the seat’s integrity.
Why Is Removing a Graco Car Seat Base So Difficult?
The main challenge in removing a Graco car seat base is releasing the extreme tension on the LATCH strap or vehicle seat belt, which makes the release mechanisms difficult to operate. Ever felt like your car seat base has become a permanent part of your vehicle? You’re not alone. That secure, wobble-free installation you worked so hard to achieve is precisely what makes the removal process so tough.

When you install the base using either the LATCH system or the vehicle’s seat belt, you are actively removing all slack to ensure the base doesn’t move more than one inch side-to-side. This process creates immense tension on the strap. This tension pulls the release mechanisms tight against their housing, making them physically difficult to press, slide, or loosen. It’s not a design flaw; it’s the result of a correctly installed, safe car seat.
Many users report that the base feels “practically fused to the seats.” This is a perfect description of what happens when the base compresses the vehicle’s seat cushion under high tension, making it feel like one solid unit. The core issue isn’t that the mechanism is broken, but that the tension must be counteracted before the release mechanism can do its job.
Step 1: Identify Your Installation Method
Before attempting removal, determine if the base is installed with the LATCH system (straps with hooks connected to vehicle anchors) or the vehicle’s seat belt, as the tension release process differs. Taking a moment to confirm how the base is secured is the essential first step that will save you time and frustration. The method you used for installation dictates the exact steps you’ll need to follow for removal.
Quick Fact: The LATCH system uses dedicated anchors in your car, while a seat belt installation uses the car’s own safety belt. Knowing which you used is the key to a quick removal.
- LATCH System Installation:
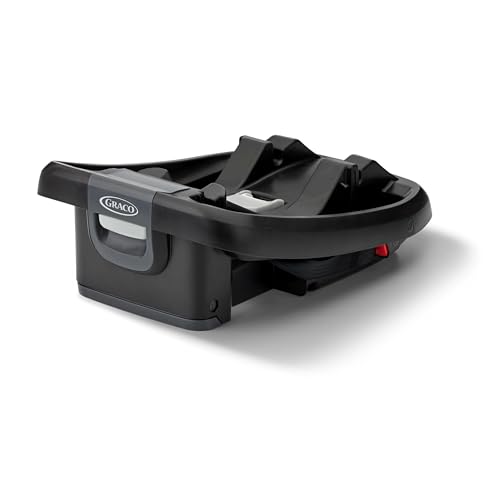
Look for two straps originating from the car seat base. Each strap will end in a hook or connector that is clipped onto a small, metal anchor bar located in the crease of your vehicle’s back seat. You will not be using the car’s regular seat belt in this type of installation. Vehicle Seat Belt Installation:
This method uses your car’s actual seat belt, which is threaded through a specific path on the car seat base and buckled. The base will often have a lock-off clip or, in newer models, a SnugLock arm that clamps down on the belt to hold it tight.
For the most accurate information, it is always best to check the specific car seat manual for your model. This reinforces safety and ensures you are following the manufacturer’s precise instructions.
Step 2: How to Remove a Base Installed with the LATCH System
To remove a LATCH-installed base, push down hard on the base to relieve tension, then press the release button on the strap’s buckle to loosen it before unhooking the LATCH connectors from the vehicle anchors. This process is all about creating slack where there is none.
Pro Tip: Use your body weight to press the base firmly down into the vehicle seat. This is the single most effective trick for creating enough slack to loosen the strap. This action temporarily compresses the vehicle’s seat cushion, giving the strap a fraction of an inch of slack—often just enough to get the release mechanism to move.
Here is the step-by-step process:
- Access the Base: If the infant carrier is in the base, remove it first so you have clear access to the base and the LATCH strap.
- Locate the LATCH Strap and Buckle: Find the strap that is connected to the vehicle’s LATCH anchors. Follow it to the adjustment buckle or mechanism on the strap itself. This is usually a metal buckle with a small button or tab for releasing tension.
- Apply Downward Pressure: This is the most important action. Place a knee or both hands firmly in the center of the car seat base and push down with significant body weight. You are trying to sink the base deeper into the car’s seat.
- Press the Release Button: While maintaining downward pressure, use your other hand to press and hold the release button or tab on the LATCH strap buckle.
- Pull to Loosen: With the button pressed and weight on the base, pull the strap in the direction that creates slack. You should feel the strap begin to loosen. Pull out several inches of slack to make the next step easy.
- Detach the Connectors: Once the strap is loose, press the red release button on each LATCH connector and pull it away from the vehicle’s anchor bar.
- Remove the Base: With both connectors detached, the base is free and can be lifted out of the car.
2a. Releasing Tension – The Crucial Step
Create slack by pressing the base down and slightly back into the vehicle seat while simultaneously pressing the release tab on the LATCH strap buckle. This coordinated movement is the key to overcoming a stuck base. As many parents have found, the trick is to work with the seat, not against it.
Here are the specific techniques that work best:
- Use Your Knee: For maximum force, place one knee directly in the middle of the base where the baby would sit. Use your body weight to drive it down into the seat cushion. This frees up both of your hands to work on the release buckle.
- Push and Wiggle: While applying pressure, slightly wiggle the base side-to-side. This can help shift the tension and make it easier for the release tab to engage.
- Push Towards the Buckle: In addition to pushing down, apply some pressure in the direction of the buckle you are trying to loosen. This can further help in creating that tiny bit of slack needed.

2b. Detaching the LATCH Connectors
Once the strap is loose, press the red release button on each LATCH connector and pull it off the vehicle’s anchor bar. This final step should be incredibly easy once the tension is gone. If you are still struggling to unhook the connectors, it means you need to create more slack in the LATCH strap, so return to the previous step and loosen it further.
Simply locate each connector where it attaches to the vehicle’s metal anchor. On the connector itself, there will be a prominent press the release buttons, usually red in color. Press this button and the hook will open, allowing you to easily pull it off the anchor. Repeat for the other side, and the base is free.

Step 3: How to Remove a Base with a Seat Belt (Including SnugLock Models)
For bases with a SnugLock arm, release tension by pressing the red button and lifting the arm. For standard installations, unbuckle the vehicle seat belt and pull it out of the base’s lock-off. The removal process for a seat belt installation is typically more straightforward, especially for models equipped with Graco’s SnugLock technology.
Did you know? The SnugLock arm is designed to apply tension for you during installation. To remove it, you simply have to reverse that process by lifting the arm.
Here is the step-by-step process:
- Access the Lock-Off Mechanism: Ensure the infant carrier is removed from the base to get a clear view of the seat belt path and lock-off system.
- Release Tension: This is the key difference between models. Refer to the table below to identify your action. For SnugLock bases, you will lift the arm. For standard bases without this feature, you will simply unbuckle the seat belt.
- Unbuckle the Seat Belt: Press the red release button on the vehicle’s seat belt buckle to disengage it.
- Remove the Belt: Carefully pull the seat belt webbing out from the routing path and any lock-off clips on the car seat base.
- Remove the Base: Once the seat belt is completely free, the base can be lifted out of the vehicle.
| Model Type | Tension Release Action |
|---|---|
| SnugLock Base | Press red button and lift the SnugLock arm. |
| Standard Base | Unbuckle the seat belt and manually pull slack. |
Step 4: Safety First – What NOT To Do and When to Get Help
Never use tools like flatheads or unconventional methods to remove a car seat base. If you cannot remove it following the manual’s instructions, seek hands-on assistance from a certified Child Passenger Safety Technician (CPST). While it can be tempting to grab a tool to pry a stuck part loose, this can cause unseen damage to the plastic, compromising the safety integrity of the car seat.
Remember, your child’s safety is paramount. If you’re struggling, there’s no shame in asking a certified expert for help.
Caution
* Do NOT use tools: Never use a screwdriver, flathead, plunger, or any other tool to try and pry the base or its components off. This can create stress fractures in the plastic that may not be visible but could cause the seat to fail in a crash.
* Do NOT cut the straps: Under no circumstances should you ever cut the LATCH straps or the vehicle’s seat belt. This permanently damages the safety system.
* Consult the Manufacturer’s Manual: Your car seat’s manual is the ultimate authority. Always refer to it first, as mechanisms can vary slightly between different models and years.
* Find a Certified Professional: If you have followed all the steps and are still unable to remove the base, it is time to get help. A certified Child Passenger Safety Technician (CPST) is trained to handle these exact situations. They can show you how to remove it properly and can also check to ensure it’s reinstalled correctly when the time comes.
For parents seeking to simplify the process of moving car seats between vehicles, investing in a second Graco car seat base can be a game-changer, eliminating the need for frequent removal and re-installation.


FAQs About how to remove a graco car seat base
How do I release the Graco car seat base when the strap is too tight?
The best way is to apply downward pressure on the base with your body weight. This compresses the vehicle’s seat cushion, creating enough slack to operate the strap’s release button.
1. Place a knee or your hands in the center of the base.
2. Push down firmly to sink the base into the seat.
3. While holding this pressure, use your other hand to press the release tab on the LATCH strap’s metal buckle and pull to create slack.
Can you remove the base from a Graco 4-in-1 or TriRide car seat?
No, many all-in-one or 3-in-1 car seats, such as the Graco TriRide, have a non-removable base. These seats are designed to stay in the car as a single unit. This guide applies to infant car seats like the SnugRide series, which have a separate, removable base designed for convenience with a detachable carrier. Always check your manual to confirm your model type.
Where is the release button on a Graco SnugRide LATCH strap?
On most Graco SnugRide LATCH straps, the release mechanism is a button or tab on the side of the metal buckle that the strap threads through to tighten it. It’s not on the hook that connects to the car. You need to follow the strap from the hook back to this central buckle to find the small, pressable tab that allows you to loosen the strap.
Do I need any tools to remove the car seat base?
No, you should not use any tools like screwdrivers or plungers. Using tools can damage the car seat or your vehicle and compromise its safety features. The base is designed to be removed by hand using the proper techniques. If you’re having trouble, it’s an issue of tension, not a mechanical fault that requires tools to fix.
Final Summary: The Key to Easy Graco Base Removal
Removing a stubborn Graco car seat base doesn’t have to be a frustrating battle. The entire process hinges on one critical concept: releasing tension. By understanding that the secure fit is what creates the challenge, you can apply the right technique—using downward pressure—to counteract that tension and operate the release mechanisms as they were designed. Whether you have a LATCH or seat belt installation, the principle remains the same.
- Identify Your Method: First, determine if the base is installed with the LATCH system or the vehicle’s seat belt.
- The Golden Rule – Relieve Tension: The most crucial step is to push down firmly on the center of the base with your body weight. This creates the slack you need.
- Operate the Release: While maintaining pressure, press the release button on the LATCH buckle or lift the SnugLock arm to loosen the strap.
- Safety is Non-Negotiable: Never use tools, and if you’re still stuck, consult your manual or a certified Child Passenger Safety Technician (CPST).
Take these steps and confidently remove that stubborn base. If you still have trouble, remember that a certified CPST is your best resource
Last update on 2025-08-19 / Affiliate links / Images from Amazon Product Advertising API


![Car Wrap vs. Paint: Cost Guide [year]](https://carxplorer.com/wp-content/uploads/2025/08/is-it-cheaper-to-paint-or-wrap-a-car-2-60x60.jpg "Car Wrap vs. Paint: Cost Guide [year] 17")
![Are Fords Good Cars? The Unbiased Truth for [year]](https://carxplorer.com/wp-content/uploads/2025/08/is-ford-a-good-car-2-60x60.jpg "Are Fords Good Cars? The Unbiased Truth for [year] 19")