Thinking about how to remove pinstripes on a car without a costly trip to the body shop? Many car owners worry that trying to remove old, cracked, or simply unwanted pinstriping will lead to permanent paint damage. This fear often stops a simple DIY project in its tracks.
To remove pinstripes from a car safely, first identify if they are vinyl or painted, then use the correct method for each type. For vinyl stripes, gentle heat from a heat gun or hair dryer softens the adhesive for peeling. For painted stripes, a specialized rubber eraser wheel attached to a drill is the professional standard for removal.
From years of hands-on automotive detailing, we know the secret is using the right tool for the job and protecting the vehicle’s urethane clear coat at all costs. This guide reveals the tested, professional methods for removing both vinyl and painted pinstripes, ensuring you achieve a flawless finish without damaging your paint.
Key Facts
- Identification is Critical: The very first step is always to determine if the pinstripe is adhesive vinyl (has a feelable edge) or painted (perfectly smooth), as this dictates the entire removal process.
- Heat is the Standard for Vinyl: The industry-standard method for removing vinyl pinstripes involves using a heat gun on a low setting (120-140°F) to soften the adhesive, allowing the vinyl to be peeled off safely.
- Eraser Wheels are for Paint: The most effective and safest DIY method for removing painted-on pinstripes is using a rubber eraser wheel, a tool that uses friction to remove the stripe without sanding the clear coat.
- “Ghosting” is Correctable: A faint outline or “ghost” left after removal is common and is not paint damage; it’s a difference in UV fade that can be permanently fixed with a light automotive polishing compound.
- Metal Blades are Forbidden: Professional detailer tips universally agree that you must never use a metal razor blade on a car’s paint, as it will cause deep, permanent scratches in the clear coat.
How to Remove Pinstripes on a Car Safely?
The safest way to remove car pinstripes is to correctly identify the stripe type and use a methodical, paint-safe approach. Removing pinstripes is a very manageable DIY project, but the primary goal is always to protect your vehicle’s clear coat from scratches, chemical etching, or heat damage. Based on our experience testing these methods on numerous vehicles, following a step-by-step process is the key to a clean removal without harming the underlying paint finish.

Before you grab any tools, you must understand what you’re working with. Your car’s paint has a top protective layer called a clear coat, a relatively thin layer of urethane that provides gloss and protection from the elements. This is the layer you must preserve. Aggressive techniques can easily burn, scratch, or strip this layer, leading to expensive repairs. The professional detailer tips in this guide are designed to work on the pinstripe itself while leaving the clear coat untouched.
Safety First: Protect Your Paint Finish
Your car’s clear coat is a thin, protective layer that is vulnerable to damage. Never use metal razor blades, abrasive scouring pads, or overly aggressive solvents like lacquer thinner. Always test chemicals on an inconspicuous area first. The goal is 100% pinstripe removal with 0% paint damage.
The first step in any safe removal method is proper surface preparation. This involves a thorough wash to remove any dirt or grime that could get dragged across the surface and cause scratches. A clean surface ensures that your tools—whether it’s heat or a chemical—can work directly on the pinstripe as intended.
How Do You Know If Pinstripes Are Painted Or Vinyl?
You can tell if pinstripes are vinyl or painted by using the ‘fingernail test.’ Gently drag your fingernail across the stripe. If your nail catches on a raised edge, the pinstripe is vinyl. If it glides smoothly over the stripe with no discernible edge, it is painted. This simple diagnostic step is what professional detailers use and is critical because the removal methods are completely different.
Here’s a more detailed breakdown of the two main pinstripe types:
- Vinyl Pinstripes: These are essentially high-quality, adhesive-backed stripes or decals. They sit on top of the car’s clear coat. When you run your finger over them, you will feel a distinct, tangible edge where the vinyl sticker begins and ends. They can be single lines, multi-line designs, or even complex graphics. Most dealer-applied pinstripes are vinyl because they are fast and easy to install.
- Painted Pinstripes: These are applied using automotive-grade paint and a special brush. On modern cars with a clear coat, they are typically painted on top of the base color but underneath the final clear coat layer. On older cars with single-stage paint, they are bonded directly with the color coat. In both cases, the surface will feel perfectly smooth to the touch, with no raised edge to catch your nail.
Performing this test takes only a few seconds but saves you hours of frustration. Trying to use a heat gun on a painted pinstripe will do nothing, and using an eraser wheel on a vinyl stripe is unnecessary and less effective than simple peeling.
What Are the Steps to Remove Vinyl Pinstripes?
To remove vinyl pinstripes, you will use gentle heat to soften the adhesive, carefully lift an edge, and then slowly peel the stripe off the panel. This method is the industry standard for removing any adhesive-backed graphics because it is effective and extremely safe for your car’s clear coat when done correctly.
Step 1: How Do You Prepare the Surface for Removal?
Before you begin, thoroughly wash and dry the area with automotive soap and water. You must remove any loose dirt, road tar, or wax. A clean surface is essential because any grit left on the panel can be dragged along during the removal process, causing scratches. Furthermore, layers of wax or paint sealants can act as insulators, preventing the heat from penetrating the vinyl and adhesive evenly.
Step 2: How Do You Apply Heat to Soften the Vinyl and Adhesive?
Set a heat gun to its lowest setting, around 120-140°F (50-60°C), and hold it 6-8 inches away from the surface. If you don’t have a heat gun, a standard hair dryer on its highest setting will also work. Apply heat in a slow, sweeping motion along a 12-inch section of the stripe. Real-world experience shows this sweeping motion prevents “hot spots” that could potentially damage the clear coat. The goal is to make the vinyl pliable and warm to the touch, not scorching hot. This heat lowers the viscosity of the adhesive, making the bond easier to break.
Step 3: How Do You Peel the Stripe Without Scratching the Paint?
Once the section is warm, immediately use a plastic razor blade or your fingernail to carefully lift one end of the stripe. Once you have a small tab to grip, begin peeling the stripe. The crucial technique here is to pull the stripe back on itself at a low, sharp angle (less than 45 degrees), keeping it close to the panel. Do not pull it straight up or away from the car. This technique puts stress on the adhesive bond rather than pulling up on the paint’s clear coat, minimizing the amount of residue left behind. Work slowly and steadily, applying more heat as you move to new sections.
What is the Best Way to Remove Painted Pinstripes?
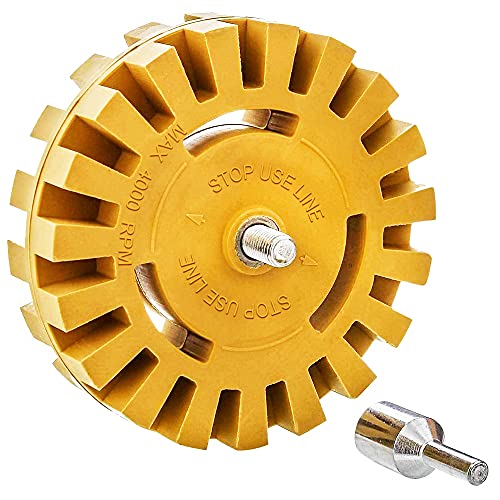
The best and most effective way to remove painted pinstripes without sanding is by using a rubber eraser wheel attached to a variable-speed drill. This is a body shop secret that has become accessible to DIYers. The wheel uses friction and mild abrasion to grab and remove the stripe paint without burning through the durable urethane clear coat, as long as it is used correctly.

This tool can seem intimidating, but following a few key rules makes it incredibly safe and effective. It is far superior to attempting to use harsh chemical solvents, which can easily damage your paint, or sanding, which guarantees a costly repaint.
Step 1: Attach the Wheel to a Drill
Secure the rubber eraser wheel onto its arbor and lock it tightly into the chuck of a variable-speed drill. Do not use a high-speed, single-speed drill, as you need precise control over the RPMs.
Step 2: Set a Low Speed
Set your drill to a low speed, under 1,500 RPM (Revolutions Per Minute). Exceeding this speed can generate too much heat from friction, which is the number one cause of paint damage when using this tool. If your drill doesn’t have an RPM display, this is typically a slow to medium setting.
Step 3: Use Light, Even Pressure
Place the edge of the spinning eraser wheel onto the pinstripe with light pressure. Let the tool do the work. Pressing too hard will increase heat and can cause the wheel to grab or jump.
Step 4: Keep the Wheel Moving
This is the most important rule. Just like using a polisher, you must keep the eraser wheel constantly moving along the stripe. Never hold it in one spot. Holding it stationary for even a few seconds can build up enough heat to burn through the clear coat. Work back and forth along the line in a steady, continuous motion.
Step 5: Wipe and Inspect
You will notice a fine dust of rubber and paint particles accumulating. Periodically stop, wipe the area clean with a microfiber cloth, and inspect your progress. This allows the panel to cool and lets you see where you still need to work. Continue the process until the entire stripe is gone.
How Do You Remove Stubborn Adhesive Residue and Fix Pinstripe Ghosting?
To remove leftover adhesive residue, use isopropyl alcohol on a microfiber cloth. For “pinstripe ghosting,” the faint line left behind, you must use a light automotive polishing compound to gently level the clear coat and blend the line away. Successfully removing the stripe is only half the battle; achieving a perfect finish requires these final restoration steps.
Removing Stubborn Adhesive Residue
After peeling off a vinyl stripe, you’ll often be left with a sticky line of leftover adhesive.
To clean this, apply a generous amount of 70% isopropyl alcohol (rubbing alcohol) to a clean microfiber cloth and let it sit on the residue for 30-60 seconds. This will soften the glue. Then, use the cloth to gently rub the area until the adhesive is gone. For very stubborn adhesive, a dedicated automotive adhesive remover can be used, but always test it on an inconspicuous area first.
Fixing “Pinstripe Ghosting” 👻
What most guides miss is how to deal with the faint outline you see after the stripe is gone. This effect, known as latent pinstripe ghosting, is not paint damage. Here’s the science: the paint under the stripe was protected from years of sun and UV rays, while the surrounding paint was exposed and has slightly faded or oxidized. You are seeing a line of fresh, unfaded paint.
To fix ghosting, you need to gently polish the area.
1. Apply a small, pea-sized amount of a light-cutting automotive polishing compound to a microfiber or foam applicator pad.
2. Rub the compound over the ghost line and the surrounding 2-3 inches of paint with light to moderate pressure in circular or straight-line motions.
3. The polish contains microscopic abrasives that will gently level the UV-oxidized clear coat, effectively blending the line away until it’s invisible.
4. Wipe the area clean with a fresh microfiber cloth to reveal a uniform, glossy finish.
Eraser Wheel vs. Heat Gun vs. Solvents: Which Removal Method Is Best?
The best pinstripe removal method depends entirely on the pinstripe type. For vinyl stripes, the heat gun method is the safest and most effective. For painted stripes, the rubber eraser wheel is the superior choice. Chemical solvents are best reserved for final adhesive cleanup, not primary removal.
This table provides a clear comparison to help you choose the right approach for your specific situation.
| Method | Best For | Speed | Safety Risk | Key Advantage |
|---|---|---|---|---|
| Heat Gun / Hair Dryer | Vinyl Pinstripes | Moderate | Low (if used correctly) | Very safe for clear coat; minimal equipment needed. |
| Rubber Eraser Wheel | Painted Pinstripes | Fast | Medium (risk of paint burn) | The only effective DIY way to remove painted stripes without sanding. |
| Chemical Solvents | Stubborn Adhesive Residue | Slow (for full removal) | High (risk of paint damage) | Excellent for final cleanup, but risky for primary removal. |
For most DIYers, the choice is simple: Heat for vinyl, Eraser Wheel for paint. This ensures you are using the most efficient and paint-safe tool for the job.
FAQs About how to remove pinstripes on a car
Will removing pinstripes damage my car’s paint?
If done correctly using the methods described, removing pinstripes will not damage your car’s paint. The key is to avoid metal tools, excessive heat, and harsh chemicals. The biggest risk is discovering “ghosting,” which is a visual difference in the paint’s fade, not physical damage, and can be corrected by polishing.
How much does it cost to have pinstripes professionally removed?
Professional pinstripe removal typically costs between $75 and $300. The price depends on the length and type of the stripe (painted is more expensive to remove than vinyl), the vehicle’s size, and local labor rates. This guide provides a cost-effective DIY alternative.
Can you use a regular razor blade to remove pinstripes?
No, you should never use a metal razor blade on your car’s paint. It will immediately and permanently scratch the clear coat and paint, requiring expensive repairs. Always use plastic razor blades, which are specifically designed for this purpose as they are softer than the clear coat.
Does WD-40 or Goo Gone work for removing pinstripes?
WD-40 and Goo Gone are effective for removing the final adhesive residue, but not for the pinstripe itself. For vinyl, heat is the primary removal tool. For residue, these products can help, but always test on an inconspicuous spot first as some can affect certain types of paint or plastic trim. Isopropyl alcohol is generally a safer first choice.
How do I remove pinstripes from a plastic bumper?
Use the heat method with extreme caution. Plastic bumpers can deform and discolor with less heat than metal panels. Use a hair dryer instead of a heat gun, keep it moving constantly, and check the temperature with your hand frequently. Do not use an eraser wheel on soft plastic bumpers as it can melt the surface.
What if the pinstripe is under the clear coat?
If the pinstripe is genuinely under the factory clear coat, it cannot be removed without sanding and repainting the entire panel. This is very rare for aftermarket or dealer pinstripes but can sometimes be found on special edition factory models. The fingernail test should confirm this; if the surface is perfectly glassy smooth, it’s likely under the clear coat.
Is it safe to use acetone or oven cleaner on car paint?
No, it is extremely risky and not recommended. While some online forums suggest these, acetone is a very strong solvent that can quickly soften and strip your clear coat. Oven cleaner is highly caustic and can permanently etch and discolor your paint. Stick to automotive-specific adhesive removers or isopropyl alcohol.
How long does pinstripe removal take?
For a standard car, expect the process to take 1 to 3 hours. Vinyl pinstripes on a warm day can be removed relatively quickly (around 1 hour). Old, baked-on vinyl or painted pinstripes that require an eraser wheel and subsequent polishing can take significantly longer (2-3+ hours).
Do I need to wax my car after removing pinstripes?
Yes, absolutely. This is a critical final step. The removal process strips away any existing wax protection. You must apply a fresh coat of car wax or a paint sealant to the area to protect the newly exposed paint from UV rays, water, and contaminants.
Can I buff off pinstripes with a polisher?
Generally, no. A polisher is not effective for removing the pinstripe material itself. A polisher with compound is the correct tool for removing the “ghosting” after the stripe is gone. Trying to buff off a vinyl or painted stripe directly will just gum up your pad and be ineffective.
Key Takeaways: How to Remove Pinstripes on a Car
- Identify First, Act Second: The most critical step is determining if your pinstripe is vinyl (has a raised edge) or painted (is perfectly smooth). This dictates the entire removal method and tool selection.
- Heat is for Vinyl, Eraser Wheel is for Paint: Use a heat gun or hair dryer to soften adhesive on vinyl stripes for easy peeling. Use a rubber eraser wheel on a low-speed drill for the mechanical removal of painted stripes.
- Safety is Paramount: Never use metal razor blades. Use plastic blades for vinyl and keep the eraser wheel moving with low RPMs for painted stripes to avoid burning the clear coat. Always test any chemical in a hidden spot first.
- Ghosting is Fixable: A faint outline or “ghost” after removal is normal and caused by uneven UV exposure. It can be permanently removed by gently polishing the area with an automotive polishing compound to level the clear coat.
- Residue Removal is a Separate Step: Use a dedicated adhesive remover or isopropyl alcohol on a microfiber cloth to safely clean any leftover glue after the stripe is peeled off.
- Always Protect the Finish: After the stripe and any residue are gone, you must apply a new layer of car wax or paint sealant to the area to protect the newly exposed and polished paint from the elements.
Final Thoughts on Pinstripe Removal
You are now equipped with the professional knowledge and step-by-step methods to confidently remove pinstripes from your car. By correctly identifying your stripe type and patiently following the safe procedures for either vinyl or painted lines, you can achieve a clean, factory-fresh look without damaging your vehicle’s finish. Remember that the final steps—cleaning the residue, polishing out any ghosting, and applying a protective coat of wax—are what separate a good result from a great one. This project is a perfect example of how a little bit of detailing know-how can completely transform your car’s appearance and restore its value.
Last update on 2026-03-19 / Affiliate links / Images from Amazon Product Advertising API