Worried about scratching your paint while trying to remove old emblem adhesive? You’re not alone. Many car owners hesitate, fearing costly damage from a simple DIY project. That sticky, stubborn residue can seem impossible to conquer without harming the clear coat.
To safely remove emblem adhesive from a car, first heat the area with a hair dryer or heat gun to soften the glue. Next, use a non-marring tool like a plastic razor blade or fishing line to gently scrape or lift the bulk of the residue. Finally, apply a dedicated automotive adhesive remover with a microfiber towel to dissolve and wipe away any remaining tackiness.
Based on professional detailer tips and methods tested on automotive paint, this guide provides a damage-free process. We’ll cover the exact tools, chemicals, and step-by-step techniques to achieve a flawless finish. You’ll discover how to tackle everything from fresh glue to stubborn “ghosting” safely and effectively.
Key Facts
- Heat is the Critical First Step: Applying moderate heat for 30-60 seconds is essential, as it softens the adhesive’s chemical bond, making it dramatically easier and safer to remove.
- Automotive-Specific Solvents are Safe: Products like 3M Adhesive Remover and Goo Gone Automotive are formulated to dissolve glue without damaging modern factory clear coats when used correctly.
- Non-Marring Tools are Essential: Using fishing line, dental floss, or plastic razor blades prevents scratches. Metal tools, like screwdrivers or steel blades, will almost certainly gouge the paint.
- “Ghosting” is Caused by UV Exposure: The faint outline left behind isn’t glue; it’s the original, unfaded paint. It can be corrected by gently polishing the area to blend the paint.
- Patience Prevents Damage: The key to a successful, damage-free removal is to work slowly and let the heat and chemicals do the work, rather than relying on aggressive force or scraping.
How Do You Remove Emblem Adhesive from a Car Safely?
The key to removing emblem adhesive from a car without damaging the paint is to use a combination of heat, a non-marring prying tool, and a paint-safe chemical solvent. This three-pronged approach ensures you weaken the adhesive bond before using any mechanical force. The number one rule professional detailers follow is to always use the least aggressive method first and work slowly. All methods discussed here are validated to be safe for your car’s clear coat when performed correctly.

It’s important to understand that not all emblem adhesives are the same. Most modern car badges use a thick, double-sided foam tape, while some older models or decals might use a vinyl glue. The method we outline focuses on the more common and challenging foam tape but works for all types. Success hinges on following the three pillars of safe adhesive removal:
- 🔥 Heat Application: This is the most crucial step. Applying gentle, consistent heat with a hair dryer or a heat gun on a low setting softens the adhesive’s chemical bond, drastically reducing its grip on the paint.
- 🧲 Mechanical Action: Once softened, the bulk of the material must be removed. This is done by slicing through the tape with fishing line or gently scraping with a plastic razor blade—tools that are too soft to scratch hardened clear coat.
- 💧 Chemical Dissolution: The final, thin layer of sticky residue is best removed with a chemical solvent designed for automotive use. The chemical does the work, dissolving the glue so it can be wiped away without forceful scrubbing.
Pro Tip: Patience is your most important tool. Rushing any step, especially the heating or chemical soaking phase, is the primary cause of paint damage. Let the tools do the work for you.
Worried about scratching your paint? By following this professional, damage-free method and performing a proper surface preparation, you can confidently debadge your vehicle and achieve a perfectly clean finish.
What Tools and Materials Are Required for Emblem Adhesive Removal?
The essential tools for removing car emblem adhesive are a heat source, a non-marring cutting or scraping tool, a paint-safe adhesive remover, and clean microfiber towels. Gathering these specific items before you begin ensures the process is smooth, safe, and effective. Using the right tool for each step is the difference between a clean finish and a costly mistake.
Here is a checklist of the required tools and materials, categorized for clarity.
Essential Tools:
- Heat Source (Hair Dryer or Heat Gun): A hair dryer on its highest setting is the safest option for beginners. A professional heat gun offers more power but requires more caution to avoid blistering the paint.
- Fishing Line or Dental Floss: High-tensile strength fishing line (15-20 lb test) is perfect for slicing through foam adhesive tape. Waxed dental floss is a great household alternative.
- Plastic Razor Blades: These are invaluable for gently scraping off the bulk of the residue without any risk of scratching the paint. They are a detailer’s secret weapon.
- Automotive Adhesive Remover: Choose a product specifically labeled “automotive” or “clear coat safe.” Top choices include 3M General Purpose Adhesive Cleaner or Goo Gone Automotive.
- Isopropyl Alcohol (IPA) 70%: Used for the final wipe-down to remove any oily residue from the adhesive remover, creating a perfectly clean surface for waxing.
- Microfiber Towels: You will need several clean, soft towels for washing, applying chemicals, and buffing to prevent cross-contamination and scratches.
Optional / Advanced Tools:
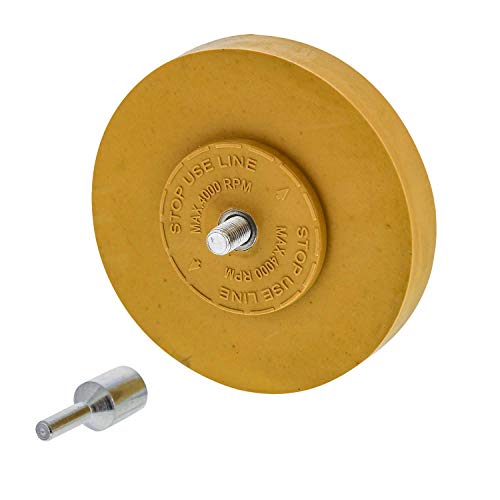
- Rubber Eraser Wheel: For extremely stubborn or old, hardened adhesive, an eraser wheel attached to a drill is the ultimate professional solution. It uses friction to safely grind away residue.
- Polishing Compound & Applicator: If you notice any “ghosting” (a faint outline of the emblem), a light-cut polishing compound is needed to level the paint and remove it.
Having these high-quality tools on hand before you start will make the job of debadging your car much easier and will prepare you for the final steps of polishing the clear coat and waxing your car to protect the newly exposed paint.
What Is The Best Step-by-Step Method for Removing Emblem Adhesive?
The most effective and safest step-by-step method follows a clear sequence: prepare, heat, slice, peel, and clean. This process systematically breaks down the adhesive’s bond and removes it in layers, ensuring the underlying car paint remains untouched. Following these steps in order is crucial for a flawless result.
Step 1: How Do You Prepare the Surface?
First, thoroughly wash and dry the emblem and the surrounding area with car soap and a clean wash mitt. This step is critical because any loose dirt or grit left on the surface can be dragged around by your tools, acting like sandpaper and causing scratches in the clear coat. After washing, a final wipe with isopropyl alcohol on a microfiber towel will remove any residual waxes or oils and ensure the surface is perfectly clean.
Step 2: How Do You Apply Heat to Soften the Adhesive?
Using a hair dryer on high or a heat gun on its lowest setting, gently heat the emblem and surrounding paint for 30-60 seconds. Keep the heat source moving continuously in a sweeping motion, holding it about 6-8 inches from the surface. The goal is to make the emblem warm to the touch, but not so hot that it could burn you. In our experience, the adhesive is ready when you can feel the warmth through the emblem.
⚠️ Safety First: Never concentrate the heat on one spot for too long, especially with a heat gun, as this can quickly blister or burn the paint. Consistent movement is key.
Step 3: How Do You Cut Through the Adhesive?
Take a 12- to 18-inch piece of fishing line or dental floss and slip it behind one of the top corners of the emblem. Holding the line taut with both hands, use a back-and-forth sawing motion to gently slice down through the softened foam tape. This motion is much like flossing a giant tooth. The line is strong enough to cut the adhesive but too soft to damage your paint.
Pro tip: Wrap the ends of the fishing line around a pair of wooden dowels or your gloved hands to get a much better grip and avoid cutting your fingers.
Step 4: How Do You Remove the Bulk of the Residue?
While the area is still warm, use your thumbnail or a plastic razor blade to gently peel and roll the large chunks of remaining foam tape and adhesive off the surface. Hold the plastic blade at a low, 30-degree angle to the paint and use a gentle pushing motion. The goal is to get under the edge of the adhesive and lift it off. This step will remove 80-90% of the material.
WARNING: Never, under any circumstances, use a metal razor blade. It will instantly and deeply gouge your paint. Stick exclusively to plastic.
Step 5: How Do You Clean the Final Sticky Residue?
Apply a dedicated automotive adhesive remover, such as 3M Adhesive Remover or Goo Gone Automotive, to a clean microfiber towel—not directly onto the paint. Place the saturated part of the towel over the remaining sticky film and let it sit for 30-60 seconds. This dwell time allows the chemical to dissolve the glue bond. Finally, gently wipe the residue away. It should come off with minimal pressure.
How Do Chemical Adhesive Removers Compare for Automotive Use?
When comparing chemical removers, 3M General Purpose Adhesive Cleaner is the professional standard for its high solvency, while Goo Gone Automotive is a more consumer-friendly, safer option that may require more dwell time. While household products like WD-40 are often suggested, they are far less effective than dedicated automotive formulas. The right choice depends on the toughness of the adhesive and your comfort level with stronger chemicals.
Here is a detailed comparison of common options:
| Feature/Aspect | 3M Adhesive Remover | Goo Gone Automotive | WD-40 | Isopropyl Alcohol (70%) |
|---|---|---|---|---|
| Primary Use | Professional-grade removal of tough acrylic & foam adhesives | General purpose consumer-grade glue & sticker removal | Lubricant & water displacer; light adhesive removal | Surface prep, degreasing, and very light residue cleaning |
| Paint Safety | Excellent when used as directed | Excellent; specifically formulated for auto paint | Generally safe, but can strip wax/sealants | Excellent, but can dry out some single-stage paints |
| Effectiveness | High (Fast acting) | Medium (Requires longer dwell time) | Low (Struggles with old, hardened glue) | Low (Best for final wipe-down) |
| Best For | Stubborn, old factory adhesive & 3M foam tape | Newer stickers, light residue, home use | A “last resort” if nothing else is available | Final surface prep before waxing or polishing |

For most DIY users, Goo Gone Automotive is the winner. It’s safe, effective for most situations, and widely available. For those tackling old, stubborn factory adhesive, investing in 3M Adhesive Remover will save significant time and effort. It’s best to avoid risky alternatives like acetone or gasoline, which can permanently damage your clear coat.
How Do You Handle Common Problems Like Stubborn Residue and Ghosting?
Even with the best technique, you can run into frustrating issues like stubborn glue that won’t budge or a faint “ghost” outline of the emblem left on your paint. From years of working with vehicle exteriors, we’ve found that these common challenges have straightforward, expert-level solutions. Knowing how to tackle them separates a good result from a perfect one.
For incredibly stubborn, old adhesive that chemical removers can’t dissolve, the professional tool of choice is a rubber eraser wheel. This tool attaches to a standard drill and uses friction to safely wear away hardened glue without harming the paint.
The other common issue is “ghosting.” This isn’t leftover glue but a sign of uneven paint aging. Thankfully, it’s almost always correctable with a bit of polishing.
How Can You Fix ‘Ghosting’ After Emblem Removal?
To fix emblem ghosting, you must gently polish the area to level the paint surface. This outline isn’t leftover glue; it’s the original, unfaded paint that was protected from the sun by the emblem. The surrounding paint has faded slightly from years of UV exposure. Polishing removes a microscopic layer of the faded clear coat, blending the two areas together.
Here is the simple process to remove ghosting:
- Wash and Clay the Area: Ensure the surface is perfectly clean. Using a clay bar after washing will remove any bonded contaminants, which is essential before polishing.
- Apply Polishing Compound: Apply a small amount of a light-cut polishing compound (like Meguiar’s Ultimate Polish) to a microfiber applicator pad.
- Buff the Area: Using firm, circular motions, work the polish into the paint over the entire affected area. Continue until the polish becomes nearly clear.
- Wipe and Protect: Wipe away the polish residue with a clean microfiber towel. The ghosting should be gone. Finish by applying a layer of car wax or paint sealant to protect the newly perfected finish.
FAQs About how to remove emblem adhesive from car
Will Goo Gone or other removers damage my car’s paint?
No, automotive-specific adhesive removers like Goo Gone Automotive and 3M Adhesive Cleaner are formulated to be safe for modern factory clear coats when used as directed. Always test on an inconspicuous spot first and avoid using non-automotive versions, which may contain harsher solvents. The key is to let the chemical do the work, not aggressive rubbing.
How is a heat gun different from a hair dryer for this job?
A heat gun produces significantly more heat (400°F – 1000°F+) than a hair dryer (around 140°F), which makes it faster at softening stubborn, old adhesive. However, this extra heat also carries a much higher risk of blistering or burning your paint if held too close or in one spot for too long. For DIYers, a hair dryer is the safer, recommended starting point.
Can I use household items like WD-40, alcohol, or gasoline?
You should only use Isopropyl Alcohol (IPA) for final cleaning; WD-40 is a poor solvent for this task, and gasoline is extremely dangerous and can permanently damage your clear coat. While WD-40 might work on very light residue, it’s less effective than dedicated products. IPA is excellent for a final wipe-down to remove oils but isn’t a primary remover. Never use gasoline or acetone.
How do I remove adhesive from matte paint or a vinyl wrap?
Do NOT use an eraser wheel, polishes, or aggressive solvents on matte paint or vinyl wraps, as this will cause permanent shiny spots or damage. For these surfaces, use the gentlest method: a hair dryer on low heat, followed by a 70% isopropyl alcohol solution on a microfiber towel. Work slowly and test in a hidden area first, as matte finishes are very sensitive.
What’s the best way to remove old, hardened emblem adhesive from a 20-year-old car?
For old, hardened adhesive, a rubber eraser wheel is the most effective professional method. The rubber generates friction and heat that safely grinds away the brittle glue without damaging the underlying paint. If you don’t have an eraser wheel, you will need to spend more time applying heat and letting a strong solvent like 3M Adhesive Remover dwell and soak into the glue.
Is it possible to remove emblem adhesive without any chemicals?
Yes, it’s possible but difficult. You can rely solely on mechanical methods if the adhesive is relatively fresh. After heating and peeling the bulk of the material, you can use your thumb or a plastic razor blade to patiently roll and scrape off all remaining residue. This takes significantly more time and care but avoids all solvents.
What should I do right after I’ve removed all the adhesive?
Immediately after all residue is gone, you should perform a final cleaning and protect the paint. Wipe the entire area down with Isopropyl Alcohol (IPA) to remove any oily solvent residue. Then, inspect for “ghosting.” Finally, apply a layer of car wax or paint sealant to the area to protect the newly exposed clear coat from UV rays and contaminants.
Can fishing line or dental floss scratch my paint?
No, monofilament fishing line and waxed dental floss are too soft to scratch modern automotive clear coat. They have enough tensile strength to slice through softened foam adhesive tape but will not cut into the hardened paint surface, making them an exceptionally safe tool for this process.
How do I remove the thin outline of a dealership sticker?
Dealership stickers are typically vinyl and their adhesive is less aggressive than emblem tape, but the removal process is similar. Gently heat the sticker with a hair dryer, peel it off starting from a corner with your fingernail or a plastic blade, and then use Goo Gone Automotive or 3M Adhesive Remover to clean up any remaining sticky residue.
What if I accidentally scratch the paint during removal?
If you create a light surface scratch or marring, it can usually be fixed by polishing. For very fine scratches, a hand polish with a product like Meguiar’s ScratchX may be sufficient. If the scratch is deeper and you can feel it with your fingernail, you may need a machine polisher and compound or professional paint correction service.
Key Takeaways: How to Remove Emblem Adhesive from Car Summary
- Safety First is Non-Negotiable: Always use the least aggressive method first. Start with a hair dryer instead of a heat gun, and always use plastic tools and paint-safe chemicals to prevent damage to your clear coat.
- Heat is Your Best Friend: The most critical step is to sufficiently heat the emblem for 30-60 seconds. This softens the factory adhesive and weakens its bond, making every subsequent step significantly easier and safer.
- Use the Right Tool for the Job: Fishing line or dental floss is the ideal tool for slicing through foam tape. A plastic razor blade is for scraping bulk residue. A rubber eraser wheel is the professional solution for old, hardened glue.
- Choose a Dedicated Automotive Solvent: Products like 3M Adhesive Remover or Goo Gone Automotive are specifically designed to dissolve adhesive without harming paint. Avoid risky household chemicals like gasoline or acetone.
- Fix Ghosting with Polish, Not More Scraping: An emblem’s “ghost” outline is caused by uneven paint fading, not leftover glue. The only way to fix it is to gently level the paint surface with a fine-cut polishing compound.
- Finish with Protection: After removing the adhesive and cleaning the area with Isopropyl Alcohol, you must apply a layer of wax or paint sealant to protect the newly exposed paint from UV rays and the elements.
Final Thoughts on Removing Car Emblem Adhesive
Removing car emblem adhesive is a completely achievable DIY project that can give your vehicle a clean, custom look. The fear of damaging your paint is valid, but it’s entirely preventable. By adopting a patient, methodical approach that prioritizes heat and the right tools over brute force, you can guarantee a flawless finish. The key to success is letting the heat, chemicals, and proper tools do the heavy lifting for you. With these professional tips in hand, you are now fully equipped to tackle the job with confidence and achieve a result you can be proud of.
Last update on 2026-03-02 / Affiliate links / Images from Amazon Product Advertising API