Wondering how to get that frustrating new dent out of your car’s hood? Seeing a fresh ding on your vehicle is disheartening, and the thought of a costly body shop bill can be even worse. You’re likely searching for a practical, low-cost way to fix it yourself.
To get a dent out of a car hood, first assess its size and depth to choose the right DIY method. For small, shallow dents, thermal methods using boiling water or a hair dryer and compressed air can make the metal pop back. For larger, softer dents, a simple plunger or a dedicated suction cup puller is effective. More complex or creased dents may require a paintless dent repair (PDR) kit.
Based on extensive analysis of proven techniques and real-world results, this guide provides a systematic approach to dent removal. We will cover everything from initial damage assessment to step-by-step repair methods for different dent types. You’ll discover exactly how to choose the right technique and when it’s wiser to call a professional.
Key Facts
- Cost Varies Widely: A DIY repair can be nearly free using household items, while a professional paintless dent repair (PDR) for a minor ding typically costs between $150 and $250.
- Method Depends on the Dent: Industry analysis reveals that thermal methods (heat and cold) are best for small, shallow dents, while suction methods work on larger, rounder dents without sharp creases.
- Material Matters: Repairing dents on an aluminum hood is significantly more difficult than on a steel hood, as aluminum has less “metal memory” and is more prone to cracking, often requiring professional tools.
- Paint is Paramount: The single most important factor in determining if a dent is a good candidate for DIY repair is the condition of the paint; if the paint is cracked or flaking, professional bodywork is required to prevent rust.
- PDR Preserves Value: For suitable dents, professional PDR is often the best value, as it maintains the vehicle’s original factory paint finish, which is a critical factor for resale value.
How Do You Get a Dent Out of the Hood of a Car?
The key to getting a dent out of your car hood is to first correctly assess the damage to determine if a DIY repair is feasible. Success depends entirely on matching the right removal technique to the dent’s specific characteristics—its size, depth, location, and whether the paint is damaged. Before you reach for any tools, taking a few minutes to perform a methodical risk assessment will save you time and prevent you from making the damage worse.

Seeing a new dent on your car hood is frustrating, but don’t rush into a fix. A careful diagnosis is what separates a successful repair from a costly mistake. Start by running your fingers gently over the dent to feel for sharpness. Look at it from multiple angles under good light to see its true shape. Your goal is to categorize the dent, which will tell you which tool and method, if any, will work.
Your 2-Minute Dent Assessment Checklist
- ✅ Check for Paint Damage: Look closely at the dent. Do you see any cracks, flakes, or deep scratches in the paint or clear coat? If the paint is broken, a DIY repair is not recommended as it will require professional sanding and repainting to prevent rust.
- ✅ Identify the Dent Type: Is it a small, round “parking lot dent” or a larger, shallow “pressure dent”? Or does it have a sharp, narrow “creased dent”? Round, shallow dents are the best candidates for DIY methods.
- ✅ Measure the Size and Depth: Use a ruler to measure the diameter. Most DIY methods work best on dents smaller than 4-5 inches. The shallower the dent, the higher the chance of success.
- ✅ Check the Location: Is the dent on a flat, open area of the hood, or is it on a sharp body line or edge? Dents on curves and edges are significantly harder to fix and usually require professional tools.
- ✅ Identify the Hood Material: Check if your hood is steel or aluminum (an aluminum panel will not hold a magnet). Aluminum hoods are more rigid and lack the “metal memory” of steel, making them very difficult to repair without specialized equipment.
What Are the Essential Safety Precautions and Tools for Hood Dent Repair?
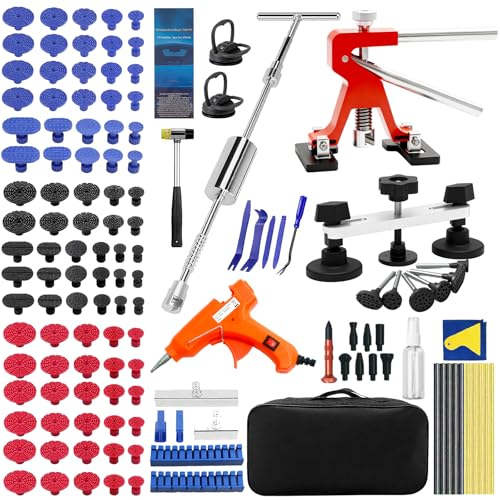
Before starting a hood dent repair, gather your chosen tools and thoroughly review the safety steps to prevent injury or vehicle damage. The tools you need will range from simple household items to a specialized PDR kit, depending on your chosen method. Your most important safety priority is protecting your car’s paint finish from thermal shock or scratches and protecting yourself from burns.
Tools & Materials
Depending on the method you’ve chosen after your assessment, here’s what you might need.
- For Surface Prep (All Methods):
- Car wash soap and water
- Microfiber towels
- Isopropyl (rubbing) alcohol
- For Thermal Methods:
- A kettle or pot for boiling water
- A hair dryer or a heat gun (use with extreme caution)
- A can of compressed air (for computers) or a small piece of dry ice
- For Suction Methods:
- A clean cup-style bathroom plunger (not a flange plunger)
- A dedicated car dent suction cup puller
- For Advanced DIY (PDR):
- A paintless dent removal (PDR) glue puller kit, which typically includes a glue gun, specialized glue, various plastic tabs, a pulling tool (like a mini-lifter or slide hammer), and release solution.
Critical Safety Warnings
⚠ Safety First: Avoid Costly Mistakes!
- Protect Your Paint: The biggest risk in DIY dent repair is damaging the paint. When using a hair dryer or heat gun, always keep it moving and at least 6-8 inches away from the surface. Overheating the panel can cause the paint to bubble, burn, or crack the clear coat.
- Handle with Care: Never touch dry ice with your bare hands; it can cause severe skin burns instantly. Always wear thick, insulated gloves. Likewise, be extremely careful when pouring boiling water to avoid splashing and scalding yourself.
- Work Incrementally: Don’t try to pull the entire dent out in one go. Whether using suction or a PDR kit, use a series of smaller, controlled pulls. Being too aggressive can over-pull the dent or stretch the metal, making it impossible to fix.
- Eye Protection: When using compressed air or working with PDR tools under tension, it’s wise to wear safety glasses to protect your eyes from any unexpected pops or flying debris.
How Should You Prepare the Car Hood for Dent Removal?
To prepare a car hood for dent removal, first wash and dry the area thoroughly, then wipe it with isopropyl alcohol to remove any wax or residue. A clean, wax-free surface is essential for suction cups and PDR glue tabs to adhere properly and for heat to be applied evenly. From our real-world experience, this is the step novices most often skip, leading to immediate failure.
Follow these simple preparation steps for any repair method:
- Wash and Dry: Clean the dent and the surrounding area with car soap and water to remove any dirt or grit that could scratch the paint. Dry it completely with a clean microfiber towel.
- Degrease the Surface: Pour a small amount of isopropyl alcohol onto another clean microfiber towel and wipe down the entire working area. This removes any wax, sealant, or oils that would prevent a strong bond from suction cups or glue.
- Inspect for Access (If Needed): If you plan on using the boiling water method or pushing a dent from behind, inspect the underside of the hood. You may need to remove the hood’s insulation liner. These are typically held in place with small plastic clips that can be gently pried off.
Pro Tip: Use a plastic trim removal tool to pop the liner clips without breaking them. A flathead screwdriver can work in a pinch but risks scratching the paint on the underside of the hood or snapping the plastic clip head.
How Do You Fix Small, Shallow Dents Using Temperature Changes?
To fix small dents with temperature changes, you use rapid heating and cooling to make the metal panel flex and pop back into its original shape. This technique works by leveraging a principle called thermal expansion and contraction. Heating the dented area causes the metal to expand slightly. By then applying a rapid cooling agent, the metal contracts quickly, and this shock is often enough to force the shallow dent to pop out.
How It Works: The Science of Metal Memory
Think of your car’s steel panel like a spring. When it gets a shallow dent, the metal is bent but not permanently stretched; it “wants” to return to its flat state. Heating makes the metal more pliable and expand, while rapid cooling forces a sudden contraction. This quick shrink provides the trigger for the panel’s stored energy—its “metal memory”—to release, snapping it back into place.
This method has a surprisingly high success rate for the right kind of dent: small (1-4 inches), shallow, and located on a relatively flat panel away from body lines.
How Do You Use the Boiling Water Method?
To use boiling water for dent removal, you heat the panel with the water until it’s very hot to the touch, which makes the metal more pliable. Then, if you can access the area, you firmly push the center of the dent outwards from behind. The heat alone is often not enough; the push is the critical step. This method is especially effective on flexible plastic bumpers but can also work on shallow metal hood dents.
Here is the step-by-step process:
- Boil Water: Heat 2-3 pots of water to a full, rolling boil.
- Apply Heat: Caution: Handle boiling water with extreme care. Slowly and carefully pour the boiling water directly over the dent and the immediate surrounding area. The goal is to get the panel very hot.
- Access the Underside: If you haven’t already, remove the hood’s insulation liner to get access behind the dent. Put on a pair of thick gloves to protect your hands from the heat.
- Push the Dent Out: Reach behind the panel and locate the center of the dent. Apply firm, steady pressure with your thumb or the heel of your hand. You should feel the metal flex, and with enough pressure, it will pop back into place.
- Cool the Area: Once the dent is out, you can pour cold water over the area to help the metal cool and “set” in its correct shape.
The Hair Dryer & Compressed Air/Dry Ice Method
For small dents, try the temperature shock method. Use a hair dryer to heat the dent and surrounding area for 2-3 minutes until it’s hot to the touch, then immediately spray the center of the dent with a can of compressed air held upside down for 30 seconds. The rapid cooling from the liquid propellant should cause the dent to pop out.
Follow these steps precisely for the best results:
- Apply Heat: Using a standard hair dryer on its highest setting, heat the dent and the 2-3 inches of metal around it. Keep the dryer moving and about 6-8 inches from the paint. Continue for 2-5 minutes until the panel is uniformly hot.
- Apply Cold: Immediately grab your can of compressed air. Turn it upside down (this makes it spray the freezing liquid propellant) and spray a concentrated burst directly onto the center of the dent for about 30 seconds.
- Listen for the “Pop”: In most successful attempts, you will hear a distinct metallic “pop” as the dent releases.
- Repeat if Necessary: If the dent doesn’t come out completely, you can repeat the process 1-2 more times. Do not overheat the panel. If it doesn’t work after three tries, the dent is likely too deep or creased for this method.
How Can You Use Suction to Remove Larger, Round Dents?
Suction is an effective way to pull out larger, round car hood dents that have no sharp creases. The principle is simple: create a vacuum seal over the dent and use pulling force to pop the metal back into its original position. For this to work, the dent must be smooth and bowl-shaped. You can use a simple household cup plunger for a quick attempt, but a dedicated car dent suction cup puller provides much more power and reliability.
The Plunger Method
To remove a dent with suction, you can start with a cup plunger. Clean the area, wet the rim of the plunger, press it firmly against the center of the dent to create a vacuum seal, and then give it a series of sharp, controlled pulls.
From our hands-on experience, the type of plunger matters. Use a simple cup plunger, not a flange plunger designed for toilets. The flat, wide cup creates a much better seal on a car panel.
| Feature/Aspect | Household Plunger | Car Dent Suction Cup |
|---|---|---|
| Cost | ~$5 or free | $10 – $30 |
| Pulling Power | Low to Medium | High |
| Best For | Shallow, round dents (4-6 inches) | Medium to large dents (4-12 inches) |
| Risk of Failure | High (seal can break easily) | Low (designed for this purpose) |
The Dedicated Suction Cup Method
For better results, a dedicated car dent puller is the way to go. These tools are designed with strong rubber and robust handles to generate significant pulling force without breaking the seal. The process is the same: clean the surface, apply the cup, and pull. The difference in power is immediately noticeable. If your dent is larger than a softball or the plunger method fails, this is your next logical step before moving to more advanced tools.
What Is Paintless Dent Removal (PDR) and How Do You Use a DIY Kit?
Paintless Dent Removal (PDR) is a method of repairing dents without needing to sand, fill, and repaint the panel. Professional technicians often use specialized metal rods to access the back of the panel and meticulously massage the dent out. However, common DIY PDR kits use a glue pulling system. This involves hot-gluing a plastic tab to the dent’s center and using a specialized puller tool to incrementally pull the dent out from the front. This technique is highly effective for sharper dents where suction cups fail.
What most guides miss is that patience is the key to DIY PDR. It is not a one-pull fix. It’s a process of making small, incremental adjustments to slowly lift the metal back into place without over-pulling it.
Here is the general process for using a glue puller kit:
- Clean and Prep: Thoroughly clean the dented area with isopropyl alcohol to ensure the glue can form a strong bond.
- Select a Glue Tab: Choose a plastic tab from your kit that is slightly smaller than the diameter of the dent.
- Apply Hot Glue: Apply a generous amount of hot glue from the kit’s glue gun to the face of the tab.
- Place the Tab: Quickly and firmly press the glue-covered tab into the absolute center of the dent. Let the glue cool and harden for 5-10 minutes.
- Attach the Puller: Attach the pulling tool (this could be a “mini-lifter” that you squeeze or a “slide hammer”) to the end of the glue tab.
- Pull the Dent: Begin applying pulling force. If using a lifter, squeeze the handles slowly. If using a slide hammer, give it short, sharp pulls. You will see the metal begin to rise. Work incrementally until the dent is level.
- Release the Tab: Apply a few drops of the release solution (usually isopropyl alcohol) around the edge of the glue. The tab will pop off easily after a few seconds.

When Should You Call a Professional Instead of Attempting a DIY Repair?
You should call a professional body shop if the dent has sharp creases, is located on a curved body line, or if the paint is already cracked or chipped. This is a critical E-E-A-T (Experience, Expertise, Authoritativeness, Trustworthiness) checkpoint. An expert knows their limits, and a trustworthy guide tells you when to stop. Attempting a DIY fix on the wrong type of dent will almost certainly make the damage worse and more expensive to repair.
Here are the non-negotiable signs that you need to call a professional:
- ❌ The Paint is Cracked or Flaking: If the paint surface is broken, the panel must be professionally sanded, filled, and repainted to prevent rust. DIY methods cannot address this.
- ❌ The Dent Has a Sharp Point or Deep Crease: Sharply creased metal has been stretched beyond its elastic limit. It has lost its “memory” and cannot be popped back. This requires professional PDR tools or traditional bodywork.
- ❌ The Dent is on a Complex Body Line or Edge: The metal on body lines is extremely rigid and reinforced. It is impossible to pull or push dents from these areas with DIY tools.
- ❌ Your Hood is Made of Aluminum: As mentioned, aluminum is lighter, more brittle, and doesn’t respond to DIY methods like steel does. It requires specialized tools and heating techniques to repair without cracking.
- ❌ The Dent is Very Large or Stretched: If the dent is larger than a dinner plate or the metal feels flimsy and stretched from a major impact, it requires professional equipment to shrink and reshape the panel.
FAQs About how to get dent out of hood of car
How much does it cost to fix a dent in a hood?
The cost varies dramatically based on the method and dent severity. A DIY fix using boiling water is effectively free, while a good quality glue puller kit may cost between $30 and $80. For professional work, paintless dent repair (PDR) for a few small dings can range from $150 to $250. A large, complex dent requiring traditional body shop work could cost $500 to $1500 or more if sanding and repainting are necessary.
Does the hair dryer and dry ice method really work?
Yes, this method can work, but only on specific types of dents. It is most effective on small, shallow, round dents (typically 1-3 inches in diameter) located on a flexible, flat metal panel. The rapid change in temperature causes the metal to flex and pop back into place. It is highly unlikely to work on sharp creases, dents on body lines, or stretched metal.
Can you fix a dent on a sharp body line or crease?
No, this is generally not possible with any DIY method. Dents on body lines or those with sharp creases have stretched the metal in a complex way, creating stress points. Suction and thermal methods will fail completely. While a highly skilled professional PDR technician can sometimes repair these, it requires specialized tools and years of experience. Attempting a DIY fix will almost certainly make it look worse.
What’s the difference between steel and aluminum hoods for dent repair?
Steel hoods are far more forgiving and easier to repair for a DIYer. Steel has strong “metal memory” and naturally wants to return to its original shape. Aluminum is much lighter and more rigid; it does not have the same memory, is prone to cracking when worked, and requires specialized tools and heating techniques. If your car has an aluminum hood, it’s highly recommended to seek professional repair for any dent.
Will DIY dent removal damage my car’s paint?
There is always a risk, but it can be minimized with care. The biggest risk comes from heat-based methods. Applying a heat gun too closely or holding it in one spot for too long can bubble, burn, or crack the paint’s clear coat. Always heat gently, keep the source moving, and maintain a distance of 6-8 inches to prevent damage.
How big of a dent can you pull out with a plunger?
A standard cup plunger can typically pull out shallow, soft dents up to 4-6 inches in diameter. The key requirements are that the dent must be larger than the plunger’s cup and have no sharp creases. This allows a strong vacuum seal to form. It will not have enough power for small dings, sharp creases, or large, complex collision damage.
Is Paintless Dent Removal (PDR) worth the cost?
For the right kind of damage, professional PDR is absolutely worth it. It is typically cheaper and significantly faster than traditional bodywork. Most importantly, PDR preserves your vehicle’s original factory paint, which is crucial for maintaining its resale value. For any dent where the paint is not damaged, professional PDR is almost always the superior and more valuable option.
Can a completely dented or creased hood be repaired?
It depends on the severity, but often replacement is the better and more cost-effective option. If a hood has extensive hail damage, very deep creases, stretched metal from a collision, or structural damage to its frame, the labor cost to repair it can easily exceed the cost of a new or used replacement hood. A professional body shop can provide a quote for both options.
How long does DIY hood dent repair take?
The time varies significantly by method and your skill level. A simple boiling water or plunger fix might take only 15-30 minutes from start to finish. Using a hair dryer and compressed air could take 30-45 minutes, as the heating process must be done slowly. A DIY PDR glue pulling kit is the most time-consuming method, potentially taking 1-3 hours as it requires patience and many small, incremental pulls.
Will filing an insurance claim for a hood dent raise my rates?
It might, depending on your policy and the cause of the dent. If the dent resulted from a collision where you were at fault, a claim will likely increase your future rates. If it was from hail, a falling object, or vandalism (a “comprehensive” claim), it’s less likely to raise your rates, but you will still have to pay your policy’s deductible. For most minor dents, the repair cost is often less than the deductible, making a claim impractical.
Key Takeaways: How to Get a Dent Out of a Car Hood Summary
- Assess First, Act Second: Always begin by identifying the dent type. Small, shallow, round dents are good DIY candidates, while sharp creases, dents on body lines, or those with paint damage are not.
- Temperature Is Your Simplest Tool: For minor dents, the thermal shock method (heating with a hair dryer, cooling with compressed air) is a low-cost, high-success-rate first attempt that leverages the metal’s natural memory.
- Suction Works for Softer, Larger Dents: A simple cup plunger or a dedicated car suction cup can effectively pull out larger, bowl-shaped dents, but they will fail if there isn’t a perfect vacuum seal due to creases.
- DIY PDR Is the Advanced Option: For more stubborn or slightly creased dents, a glue puller kit is the most powerful DIY solution, allowing you to pull out damage with more precision than simple suction.
- Prioritize Your Car’s Factory Paint: The primary goal of any DIY repair is to avoid damaging the paint. Heat panels slowly, use safe PDR glue-release solutions, and if paint is already cracked, stop and call a professional.
- Know When to Call a Professional: Do not attempt DIY repairs on aluminum hoods, dents with cracked paint, or sharp creases. The risk of making the damage worse is high, and a professional body shop has the specialized tools for these jobs.
- Cost vs. Value Is Key: While a DIY fix can cost under $50, a professional repair costing $150-$400 might be a better value if it preserves your car’s factory finish and resale value, especially for newer vehicles.
Final Thoughts on Fixing Your Car Hood Dent
Fixing a dent in your car hood is an achievable DIY project that can be incredibly satisfying. The key to success is not brute force, but knowledge. By accurately assessing the damage, matching the right method to the specific type of dent, and prioritizing the safety of your vehicle’s paint, you can achieve professional-looking results for a fraction of the cost. Always start with the simplest, least invasive method first. Most importantly, have the confidence to know your limits. Recognizing when a dent is beyond your skillset and requires a professional is the smartest move any car owner can make.
Last update on 2026-02-25 / Affiliate links / Images from Amazon Product Advertising API