Wondering how to clean the undercarriage of your car to stop rust in its tracks? You’re not alone. Many drivers struggle to remove the corrosive road salt and caked-on grime that threaten their vehicle’s frame and components.
To properly clean a car’s undercarriage, start by safely lifting the vehicle and pre-rinsing with a pressure washer to remove loose debris. Next, apply a dedicated degreaser or all-purpose cleaner, allowing it to dwell. Agitate stubborn grime with brushes, then perform a final, thorough rinse. Finish by drying the undercarriage and applying a rust-inhibiting or protective coating.
This guide is built on proven methods and hands-on experience with undercarriage detailing. You will discover a complete, step-by-step process that covers everything from safety protocols to advanced protection strategies, giving you the confidence to achieve professional-grade results at home.
Key Facts
- Corrosion Accelerant: Road salt can accelerate the corrosion process on bare metal by up to 10 times, making winter cleaning essential for vehicle longevity.
- Resale Value Impact: A clean, rust-free undercarriage can significantly improve a vehicle’s resale value, as it is a key indicator of diligent maintenance and overall condition.
- Safety Concern: Corrosion damage to critical components like brake lines, fuel lines, and frame rails poses a major safety risk, demonstrating that undercarriage cleaning is a matter of mechanical integrity.
- Moisture Trap: Caked-on mud and debris act like a sponge, trapping moisture against the metal and creating a perfect environment for rust to form, even in dry weather.
- Effectiveness of Pressure: Industry analysis reveals that using a pressure washer is significantly more effective than a standard garden hose for removing bonded salt and grime from hard-to-reach areas.
What Is The Complete Process for Cleaning a Car’s Undercarriage?
The complete process for cleaning a car’s undercarriage is a multi-stage maintenance task involving preparation, degreasing, high-pressure rinsing, detailed scrubbing, and applying a protective coating. Following this structured method is crucial for effectively removing corrosive contaminants like road salt and preventing long-term rust damage. This hands-on guide provides a complete, step-by-step method based on proven methods for both beginners and experienced DIY mechanics.

Unlike basic guides that just focus on washing, a professional approach treats this as a core part of vehicle preservation. It’s about more than just appearance; it’s about protecting your investment and ensuring the long-term health and safety of your car. We can break this comprehensive process down into three main stages:
- Preparation: This stage is all about safety and setup. It involves choosing the right location, ensuring the vehicle is cool, and using proper technique to safely lift and secure the car for access.
- Cleaning: This is the active washing stage. It follows a sequence of pre-rinsing to remove loose dirt, applying chemicals to break down stubborn grime, agitating tough spots, and performing a final, thorough rinse.
- Protection: After the undercarriage is clean and dry, this final stage involves applying a protective coating. This step creates a barrier against future moisture and salt, providing long-term rust prevention and making future cleanings easier.
Why Is Cleaning Your Car’s Undercarriage Critically Important?
Cleaning a car’s undercarriage is essential to prevent rust caused by road salt and moisture, which can severely damage the vehicle’s frame, brake lines, and suspension components. It protects your financial investment by maintaining the car’s structural integrity and resale value, while also ensuring long-term operational safety. Regular washing is the most effective form of rust prevention.
The hidden world beneath your car is a battleground. It’s constantly assaulted by water, rocks, mud, and—most destructively—road salt. This salt, often magnesium chloride or sodium chloride, initiates a chemical reaction called galvanic corrosion when combined with water and metal. This process creates ferrous oxide (rust), which eats away at your car’s metal components.
Neglecting this area leads to serious consequences, while diligent maintenance provides significant benefits:
- ✅ Prevents Costly Rust Damage: The most obvious benefit is stopping rust before it starts. Repairing a rusted frame or replacing corroded brake lines can cost thousands of dollars. Regular cleaning is a small investment to avoid huge repair bills.
- ✅ Protects Your Investment: A clean, well-maintained undercarriage is a major selling point. It signals to potential buyers that the car has been cared for meticulously, directly improving its resale value.
- ✅ Ensures Mechanical Integrity and Safety: Rust can compromise the strength of the vehicle’s frame. It can also cause brake or fuel lines to fail, creating a serious safety hazard. Cleaning preserves the integrity of these critical systems.
- ✅ Allows for Early Inspection: A clean undercarriage makes it easy to spot potential problems like oil leaks, coolant drips, or damaged components that would otherwise be hidden under a layer of grime.
What Tools and Supplies Do You Need for Undercarriage Cleaning?
The essential tools for cleaning a car’s undercarriage include a pressure washer with an undercarriage cleaner attachment or water broom, a heavy-duty degreaser or all-purpose cleaner (APC), and various brushes. For safety, you will need a hydraulic jack, at least two jack stands rated for your vehicle’s weight, wheel chocks, and protective eyewear.
Having the right equipment not only makes the job safer and easier but also delivers far superior results. Based on real-world implementation, here is a comprehensive checklist of what you’ll need, broken down by category.
Essential Cleaning Hardware
- Pressure Washer: A unit with at least 2000 PSI (Pounds per Square Inch) and 1.5 GPM (Gallons Per Minute) is recommended for effective cleaning.
- Undercarriage Cleaner Attachment: Also known as a water broom, this wheeled attachment rolls under the car and provides a wide, even spray for fast and thorough rinsing.
- Variety of Brushes: You’ll need a long-handled, stiff-bristle brush for frame rails and a softer-bristle wheel-specific brush for suspension components.

Cleaning Agents & Chemicals
- Degreaser or All-Purpose Cleaner (APC): Choose a quality automotive-specific product designed to break down road grime and oil. A heavy-duty degreaser is best for very greasy areas.
- Car Wash Soap: For use in a bucket to lubricate your brushes during the agitation step.
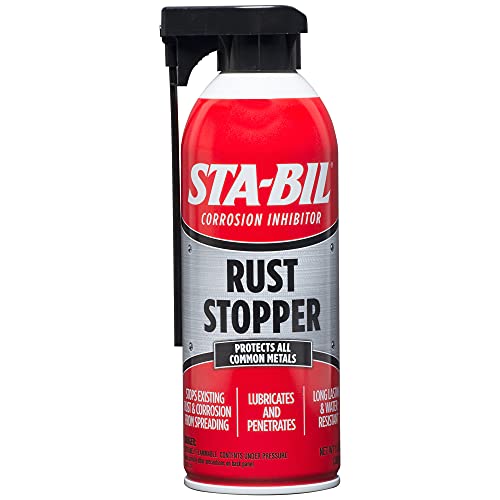
- Protective Coating (Optional but Recommended): A corrosion inhibitor like a lanolin-based spray (e.g., Fluid Film) or a cavity wax for post-cleaning protection.
Safety Equipment
- Hydraulic Floor Jack: Ensure it’s rated to lift your vehicle’s weight.
- Jack Stands (At least 2): Never work under a car supported only by a jack. Your jack stands must be rated for the vehicle’s weight.
- Wheel Chocks: To prevent the car from rolling while lifted.
- Safety Goggles and Gloves: To protect you from high-pressure water, debris, and chemicals.
Optional but Recommended Tools
- Creeper: A low-profile, wheeled board that makes moving around under the car much more comfortable.
- Foam Cannon: An attachment for your pressure washer that applies a thick, clinging layer of cleaner for longer dwell time and better performance.
- Leaf Blower: The fastest and most effective way to dry the undercarriage after washing.
How Do You Safely Prepare Your Car for an Undercarriage Wash?
To safely prepare your car for an undercarriage wash, first park on a flat, level surface and ensure the engine, exhaust, and brakes are completely cool. Engage the parking brake and chock the wheels that will remain on the ground. Use a hydraulic jack on the vehicle’s designated factory jacking points to lift it, then securely place rated jack stands under the frame rails or pinch welds before lowering the car onto them.
This is the most critical part of the process. Safety protocols are not optional. Taking shortcuts here can lead to serious injury or vehicle damage. Follow these steps precisely.
- Park on Level Ground: Choose a flat, solid surface like a concrete driveway or garage floor. Never attempt to lift a car on soft ground like grass or asphalt on a hot day.
- Cool Down the Vehicle: Wait at least one hour after driving. A hot exhaust system or engine can cause the cold water to crack metal components, and hot brakes can be damaged.
- Secure the Vehicle: Engage the parking brake firmly. Place wheel chocks behind the wheels that will remain on the ground to prevent any possibility of rolling.
- Lift with a Jack: Consult your owner’s manual to locate the vehicle’s factory-approved jacking points. These are reinforced areas designed to handle the load. Place the jack saddle on the point and lift the car high enough to fit the jack stands underneath.
- Support with Jack Stands: Position the jack stands under a solid part of the car’s frame or the designated pinch welds. Slowly lower the jack until the car’s weight is resting entirely on the stands.
WARNING: Never get under a vehicle that is supported only by a hydraulic jack. Jacks can and do fail. Once the car is resting on the stands, give it a firm shake at the bumper to ensure it is stable and will not move.
What Are The Step-by-Step Instructions for Cleaning Your Car’s Undercarriage?
The step-by-step process for cleaning a car undercarriage begins with a high-pressure pre-rinse to remove loose dirt. Second, apply a quality degreaser and let it dwell for 5-10 minutes. Third, agitate stubborn areas like wheel wells with brushes. Fourth, perform a thorough final rinse. Finally, dry the undercarriage before inspection and protection.
Step 1: How Do You Pre-Rinse the Undercarriage to Remove Loose Debris?
To pre-rinse the undercarriage, use a pressure washer with a 40-degree (white) tip to safely blast away loose mud, salt, and road grime. This initial step removes the top layer of gunk, allowing the chemical cleaners to work more effectively on the bonded grime underneath. Work systematically from one end of the vehicle to the other, focusing on flushing out debris.
Think of this like sweeping a floor before you mop. You’re just getting the big, loose stuff out of the way. Use your undercarriage cleaner attachment or a standard wand, maintaining a safe distance of 12-18 inches from the surface. Key areas to focus on are:
- Wheel Wells
- Inside Frame Rails
- Suspension Pockets and Cross-members
Pro Tip: Angle the water spray to push debris out from under the car, rather than just moving it around from one spot to another. Work from the center outwards.
Step 2: How Do You Apply Degreaser to Dissolve Stubborn Grime and Salt?
Apply a dedicated automotive degreaser or all-purpose cleaner (APC) to the entire wet undercarriage using a pump sprayer or foam cannon. The chemical does the heavy lifting for you by breaking down stubborn grease, oil, and road film. For general grime, a quality APC is sufficient. For heavy oil stains, a stronger solvent-based degreaser may be necessary.
Once applied, allow the product to dwell for 5-10 minutes. This “dwell time” is when the surfactants in the cleaner are actively dissolving the grime.
WARNING: Do not allow the degreaser to dry on the surface. If it starts to dry, lightly mist it with water to keep it active. A dried cleaner can leave stains that are difficult to remove.
Step 3: How Do You Agitate and Scrub Hard-to-Reach Areas?
For a truly thorough clean, manually agitate stubborn grime in areas like wheel wells, inside frame rails, and around suspension components using a variety of long-handled brushes. This mechanical scrubbing, performed while the degreaser is still wet, is the difference between an “okay” job and a “professional” one. Pressure and chemicals alone cannot remove everything.
Use a stiff-bristle brush for durable surfaces like the frame and a softer-bristle wheel brush for cleaning around more delicate suspension components and their rubber bushings. Dip your brush into a bucket of car wash soap to add lubrication as you scrub.
Step 4: How Do You Perform the Final, Thorough Rinse?
The final rinse involves systematically washing the entire undercarriage with high-pressure water to remove all traces of degreaser and loosened grime. This rinse should be more methodical than the pre-rinse. Work from one end to the other and pay special attention to flushing out frame rails, pockets, and crevices.
It is critical to remove 100% of the cleaning chemical. Any leftover degreaser can attract dirt or even cause long-term damage to coatings.
Continue rinsing until the water running off the undercarriage and onto the ground is 100% clear. When you see no more suds or dirt in the runoff, you know the job is done.
How Do You Protect Your Undercarriage After Cleaning to Prevent Rust?
After cleaning and thoroughly drying the undercarriage, apply a corrosion inhibitor or rust prevention spray to protect the metal. This is the most critical step for long-term rust prevention, especially for vehicles in winter climates. A protective coating creates a barrier that repels water and salt, stopping rust before it can even start.
First, ensure the undercarriage is completely dry. A leaf blower is the fastest way to blow water out of every crevice. Once dry, choose a protection product that suits your needs.
Lanolin-Based Sprays (e.g., Fluid Film, Woolwax)
These products use lanolin (wool grease) to create a non-drying, self-healing, water-repellent film. They are excellent for used vehicles as they creep into seams and stop existing surface rust from spreading.
- Pros: ✅ Stops existing rust, creeps into crevices, easy to apply.
- Cons: ❌ Needs re-application annually, can have a distinct smell, attracts some dirt.
Cavity Wax
This is a thin, waxy spray designed to be injected into enclosed spaces like frame rails and rocker panels using a 360-degree spray nozzle. It prevents rust from starting on the inside, which is a common failure point.
- Pros: ✅ Protects hard-to-reach internal areas, long-lasting.
- Cons: ❌ Requires specialized nozzles, can be messy to apply.
Rubberized Undercoating
This is a permanent, paint-like coating that dries hard and provides a durable barrier against rocks and moisture. It is best applied to brand-new vehicles or perfectly clean, rust-free metal.
- Pros: ✅ Permanent, durable, provides sound deadening.
- Cons: ❌ Can trap moisture and hide rust if not applied perfectly or if it gets chipped.
| Protection Type | Best For | Application Method | Durability |
|---|---|---|---|
| Lanolin/Fluid Film | Annual re-application, used vehicles | Aerosol spray or spray gun | 1-2 years |
| Cavity Wax | Internal frame rails, new vehicles | Aerosol with 360° nozzle | 3-5 years |
| Rubberized Undercoat | New or perfectly clean metal | Aerosol or professional gun | 5+ years (permanent) |
FAQs About how to clean undercarriage of car
How often should you clean your car’s undercarriage?
As a general rule, you should clean your car’s undercarriage at least twice a year: once in the spring to remove winter salt and once in the fall to remove summer grime. For those in “Salt Belt” regions or coastal areas, cleaning it every 1-2 months during the winter is highly recommended for effective rust prevention.
How can you clean the undercarriage of a car without a pressure washer?
You can effectively clean the undercarriage using a garden hose equipped with a high-pressure nozzle, like a “fireman” style nozzle. While less powerful, you can also use a lawn sprinkler placed under the car, moving it every 10-15 minutes to soak and rinse different sections. This method requires more time and manual scrubbing but is a viable alternative.
Is it safe to use a pressure washer on a car’s undercarriage?
Yes, it is generally safe, provided you use the correct technique and nozzle. Use a wide-angle nozzle (40-degree/white tip) and keep a distance of at least 12-18 inches from the surface. Avoid spraying directly at electrical connectors, seals, or the back of wheel bearings to prevent forcing water into sensitive areas.
Do automatic car washes effectively clean the undercarriage?
Most automatic car washes with an “undercarriage spray” feature provide only a light rinse, which is better than nothing but often lacks the pressure and chemical action to remove stubborn, caked-on grime and salt. For a truly deep clean and effective rust prevention, a manual wash using the methods in this guide is far superior.
Can you use dish soap to clean a car’s undercarriage?
While you technically can, it is not recommended as a primary cleaner. Dish soaps can strip away waxes and protective coatings. For the undercarriage, this is less of a risk than on paint, but a dedicated automotive All-Purpose Cleaner (APC) or degreaser is formulated to be more effective on road grime and safer for automotive materials.
How do you clean thick mud out of frame rails after off-roading?
To clean mud from frame rails, use a pressure washer with a focused nozzle (15-degree) to carefully blast inside the frame’s access holes, flushing the mud out. You may need to use a long, thin pipe or wand attached to a hose to break up compacted mud. It is critical to get all the mud out as it holds moisture and accelerates rust.
What’s the best way to clean salt off the underside of a car?
The best way is to use a combination of high-pressure water and a dedicated salt-removing or alkaline cleaning solution. Pre-rinse thoroughly with a pressure washer, then apply the cleaner and let it dwell to neutralize the corrosive salts. A final, heavy rinse is critical to ensure all salt and chemical residue is completely removed.
How do you dry the undercarriage after washing?
The best method is to use a leaf blower to quickly and forcefully blow water out of all crevices, off surfaces, and away from components. If you don’t have a leaf blower, you can let it air dry for several hours on a dry, low-humidity day. Driving the car for 10-15 minutes can also help heat from the engine and exhaust evaporate moisture.
Is it safe to spray the engine bay from underneath?
It is generally not recommended to spray directly up into the engine bay from underneath with high pressure. The bottom of the engine has many exposed electrical connectors, sensors (like oxygen sensors), and the alternator, which can be damaged by direct, high-pressure water spray. Stick to cleaning the chassis and avoid the engine itself from below.
What is an undercarriage water broom?
An undercarriage water broom is a pressure washer attachment consisting of a long wand connected to a bar with multiple spray nozzles and wheels. You simply roll it back and forth under the car, and it provides a wide, even, and consistent spray pattern, making the job much faster and easier than using a standard wand alone.
Key Takeaways: How to Clean Undercarriage of Car Summary
Mastering how to clean the undercarriage of your car is one of the most valuable DIY maintenance skills you can learn. It directly impacts your vehicle’s safety, longevity, and value. Here are the most important points to remember from this guide:
- Prevention is the Goal: The primary reason to clean your car’s undercarriage is to prevent rust and corrosion caused by road salt and moisture. This single act preserves your vehicle’s structural integrity and resale value.
- Safety is Not Optional: Always use rated jack stands on a level surface and chock the wheels before getting under your vehicle. Following proper safety protocols is the most important step of the entire process.
- The Right Tools Matter: While a hose can work, a pressure washer combined with an undercarriage cleaner attachment and a quality automotive degreaser spray will deliver dramatically faster and more effective results.
- Follow the 3-Stage Process: A professional-level clean follows a clear sequence: 1) Pre-Rinse to remove loose debris, 2) Degrease & Agitate to chemically and mechanically loosen bonded grime, and 3) Final Rinse to remove all contaminants.
- Dwell Time is Key: The magic of cleaning happens when you allow the degreaser to soak and dissolve grease for 5-10 minutes. Do not skip this “dwell time,” but never let the chemical dry on the surface.
- Don’t Stop at Cleaning: For true long-term protection, especially after a winter season, the final step should be applying a corrosion inhibitor like a lanolin-based spray or cavity wax to the clean, dry undercarriage.
Final Thoughts on Cleaning Your Car’s Undercarriage
Regularly cleaning your car’s undercarriage is one of the most impactful maintenance tasks you can perform to ensure vehicle longevity and safety. It moves beyond a simple car wash into the realm of essential preventative care. By understanding the “why” behind rust and following a structured process of preparing, cleaning, and protecting, you can effectively combat corrosion and preserve your investment for years to come. What may seem like a daunting task is made simple with the right knowledge and tools. Your efforts will be rewarded with a healthier, safer, and more valuable vehicle.
Last update on 2026-03-06 / Affiliate links / Images from Amazon Product Advertising API


![BMW First Car Expert Costs Analysis and Buying Guide [year]](https://i0.wp.com/carxplorer.com/wp-content/uploads/2026/03/BMW-First-Car-Expert-Costs-Analysis-and-Buying-Guide-year-2.jpg?resize=60%2C60&ssl=1 "BMW First Car Expert Costs Analysis and Buying Guide [year] 4")


